> ## Documentation Index
> Fetch the complete documentation index at: https://openops-ecb4f397-mintlify-add-install-command-explanation-5.mintlify.site/llms.txt
> Use this file to discover all available pages before exploring further.
# Contributing an Integration
> Developing a fully working OpenOps block to integrate with a third-party service
export const NarrowImage = ({src, alt, widthPercent}) => {
const className = `narrow-image-${useId().replace(/:/g, '-')}`;
const widthRule = widthPercent ? `width: ${widthPercent}%;` : '';
return <>
 ;
};
[Creating a Minimal Block](/contributing/creating-a-minimal-block/) demonstrated how to use scaffolding and make a block show up in the OpenOps UI. Let's now see how you would create a fully functional integration with a third-party service.
OpenOps integrates with Jira Cloud and Linear, but what if you use a different service for tracking your cloud optimization opportunities? Let's see how you would create a block that integrates with [JetBrains YouTrack](https://www.jetbrains.com/youtrack/) via its [REST API](https://www.jetbrains.com/help/youtrack/devportal/youtrack-rest-api.html).
The process of developing the YouTrack block will include:
* Scaffolding the block and actions using the OpenOps CLI.
* Implementing custom API key-based authentication that enables the user to set up a connection.
* Developing a simple action that authenticates with YouTrack and retrieves data.
* Developing an advanced action that involves several dynamic, interdependent properties and updates a YouTrack issue.
This is not a step-by-step guide. Instead, it's an overview that highlights prominent parts of the process that you can use to develop your own blocks.
## Scaffolding a new block
To scaffold a new block, you run the following command:
```bash theme={null}
npm run cli blocks create
```
For a YouTrack integration, you would supply the following information to the CLI:
1. `Block name`: `youtrack` (lowercase).
2. `Package name`: leave blank to use the default.
3. `Authentication type`: select `Custom (Custom properties)`.
4. `Create opinionated folder structure with stubs for actions, tests, and common service layer`: select `Yes - Create full folder structure with stubs`.
OpenOps generates a full project template inside `packages/blocks/youtrack/`, including `package.json`, TypeScript configuration files, ESLint and Jest configuration files, an entry point for the block at `src/index.ts`, and a starter test file at `test/index.test.ts`.
Let's take a closer look at the generated files.
### src/index.ts
`src/index.ts` is the entry point to the new block. It uses the `createBlock()` function from the OpenOps block framework to create a new block. This function takes a number of arguments, of which the most important ones are:
* `auth`: authentication implementation for the block. It defines which credentials the user needs to specify in the block's [connection](/cloud-access/access-levels-permissions) properties to authenticate with the API that the block integrates with.
* `actions`: an array that contains the actions that the block exposes. The scaffolded version includes a predefined action that allows making a custom API call to the block's API.
```ts theme={null}
import { createCustomApiCallAction } from '@openops/blocks-common';
import { createBlock, Property } from '@openops/blocks-framework';
import { BlockCategory } from '@openops/shared';
import { youtrackAuth } from './lib/auth';
export const youtrack = createBlock({
displayName: 'Youtrack',
auth: youtrackAuth,
minimumSupportedRelease: '0.20.0',
logoUrl: 'https://static.openops.com/blocks/youtrack.png',
authors: [],
categories: [BlockCategory.FINOPS],
actions: [
createCustomApiCallAction({
baseUrl: () => 'https://api.youtrack.com',
auth: youtrackAuth,
additionalProps: {
documentation: Property.MarkDown({
value:
'For more information, visit the [Youtrack API documentation](https://docs.youtrack.com/reference/introduction).',
}),
},
}),
],
triggers: [],
});
```
### src/lib/auth.ts
Scaffolding generates a placeholder authentication implementation in a separate file. It uses the `CustomAuth()` helper function from the OpenOps block framework. The function takes several parameters, of which the most important ones are:
* `props`: an object that defines the inputs required to authenticate with the service that the block integrates with.
* `validate`: a function for optional validation of the inputs defined in `props`.
```ts theme={null}
import { BlockAuth, Property } from '@openops/blocks-framework';
export const youtrackAuth = BlockAuth.CustomAuth({
authProviderKey: 'youtrack',
authProviderDisplayName: 'Youtrack',
authProviderLogoUrl: 'https://static.openops.com/blocks/youtrack.png',
description: 'Configure your Youtrack connection',
required: true,
props: {
apiKey: Property.SecretText({
displayName: 'API Key',
required: true,
}),
baseUrl: Property.ShortText({
displayName: 'Base URL',
description: 'The base URL for Youtrack API',
required: true,
}),
},
validate: async ({ auth }) => {
// Add validation logic here
return { valid: true };
},
});
```
### Project files
OpenOps uses [Nx](https://nx.dev/) as its build system. The `project.json` file defines how the new block is built, tested, and linted within the Nx workspace. It specifies the source root, output path, TypeScript configuration, package entry points, and assets. It also declares executors for build (`@nx/js:tsc`), test (`@nx/jest:jest`), and lint (`@nx/eslint:lint`).
```json theme={null}
{
"name": "blocks-youtrack",
"$schema": "../../../node_modules/nx/schemas/project-schema.json",
"sourceRoot": "packages/blocks/youtrack/src",
"projectType": "library",
"tags": [],
"targets": {
"build": {
"executor": "@nx/js:tsc",
"outputs": ["{options.outputPath}"],
"options": {
"outputPath": "dist/packages/blocks/youtrack",
"tsConfig": "packages/blocks/youtrack/tsconfig.lib.json",
"packageJson": "packages/blocks/youtrack/package.json",
"main": "packages/blocks/youtrack/src/index.ts",
"assets": ["packages/blocks/youtrack/*.md"],
"buildableProjectDepsInPackageJsonType": "dependencies",
"updateBuildableProjectDepsInPackageJson": true
}
},
"test": {
"executor": "@nx/jest:jest",
"outputs": ["{workspaceRoot}/coverage/{projectRoot}"],
"options": {
"jestConfig": "packages/blocks/youtrack/jest.config.ts"
}
},
"lint": {
"executor": "@nx/eslint:lint",
"outputs": ["{options.outputFile}"]
}
}
}
```
`package.json` is a minimal metadata file that declares the block's name and version within the Nx workspace. Unlike typical npm packages, this file isn't meant for publication to the npm registry. Instead, it helps Nx identify the project and marks the block as a versioned unit within the larger repository.
```json theme={null}
{
"name": "@openops/block-youtrack",
"version": "0.0.1"
}
```
If your block requires additional dependencies, such as an SDK for the service you're integrating with, you can add them to the `dependencies` section of `package.json`.
### Test files
`test/index.test.ts` is a stub Jest test fixture that includes a few sample tests for the block:
```ts theme={null}
import { youtrack } from '../src/index';
describe('block declaration tests', () => {
test('should return block with correct authentication', () => {
expect(youtrack.auth).toMatchObject({
type: 'CUSTOM_AUTH',
required: true,
authProviderKey: 'youtrack',
authProviderDisplayName: 'Youtrack',
authProviderLogoUrl: 'https://static.openops.com/blocks/youtrack.png',
});
});
test('should return block with correct number of actions', () => {
expect(Object.keys(youtrack.actions()).length).toBe(1);
expect(youtrack.actions()).toMatchObject({
custom_api_call: {
name: 'custom_api_call',
requireAuth: true,
},
});
});
});
```
You can run these tests using `nx test blocks-youtrack`.
There's also a Jest configuration file, `jest.config.ts`, which inherits shared settings from the OpenOps Jest preset, references a TypeScript config file, defines recognized file extensions, and specifies where to store code coverage reports:
```ts theme={null}
export default {
displayName: 'blocks-youtrack',
preset: '../../../jest.preset.js',
setupFiles: ['../../../jest.env.js'],
testEnvironment: 'node',
transform: {
'^.+\\.[tj]s$': ['ts-jest', { tsconfig: '/tsconfig.spec.json' }],
},
moduleFileExtensions: ['ts', 'js', 'html'],
coverageDirectory: '../../../coverage/packages/blocks/youtrack',
};
```
### TypeScript configuration files
Scaffolding generates three TypeScript configuration files: `tsconfig.json`, `tsconfig.lib.json`, and `tsconfig.spec.json`.
`tsconfig.json` is the base config for the block. It extends the workspace's root `tsconfig.base.json` and enforces strict compiler options but doesn't include any source files directly. Instead, it references the other two config files, serving as an entry point for both:
```json theme={null}
{
"extends": "../../../tsconfig.base.json",
"compilerOptions": {
"module": "commonjs",
"forceConsistentCasingInFileNames": true,
"strict": true,
"noImplicitOverride": true,
"noPropertyAccessFromIndexSignature": true,
"noImplicitReturns": true,
"noFallthroughCasesInSwitch": true
},
"files": [],
"include": [],
"references": [
{
"path": "./tsconfig.lib.json"
},
{
"path": "./tsconfig.spec.json"
}
]
}
```
`tsconfig.lib.json` applies to the block's source code. It outputs compiled files to `dist/out-tsc`, generates type declarations, and includes only non-test TypeScript files under `src/`:
```json theme={null}
{
"extends": "./tsconfig.json",
"compilerOptions": {
"module": "commonjs",
"outDir": "../../../dist/out-tsc",
"declaration": true,
"types": ["node"]
},
"exclude": ["jest.config.ts", "src/**/*.spec.ts", "src/**/*.test.ts"],
"include": ["src/**/*.ts"]
}
```
`tsconfig.spec.json` is tailored for testing. It includes test and declaration files and configures Jest typings:
```json theme={null}
{
"extends": "./tsconfig.json",
"compilerOptions": {
"outDir": "../../../dist/out-tsc",
"module": "commonjs",
"types": ["jest", "node"]
},
"include": [
"jest.config.ts",
"src/**/*.test.ts",
"src/**/*.spec.ts",
"src/**/*.d.ts"
]
}
```
### Other files
`.eslintrc.json` defines JavaScript and TypeScript linting behavior for the block, extending the OpenOps repository's root ESLint configuration. The `overrides` section provides placeholders for block-specific linting rules if you want to introduce them.
`README.md` stubs out documentation for the block.
## Post-scaffolding cleanup
OpenOps may alter the spelling of your block's display name during scaffolding, so review this and run search and replace if needed. For example, with YouTrack it didn't use the proper casing for the product name, generating "Youtrack" instead of "YouTrack".
### Product logo
OpenOps stores logo assets within the project at `packages/react-ui/public/blocks/`. When contributing an integration, add your product's logo file (PNG or SVG format) directly to this directory and reference it using the path `/blocks/[product-name].png` in your integration code.
For example, if your product is called YouTrack, add `youtrack.png` to `packages/react-ui/public/blocks/` and set the logo URL to `/blocks/youtrack.png` in your integration definition. This ensures your logo is included in the PR and will work immediately without requiring additional steps.
### Categories
When scaffolding a block, OpenOps sets the block's `categories` property to `[BlockCategory.FINOPS]`. The `BlockCategory` enum defines the categories that a block can belong to, such as:
* `FINOPS`: integrations with tools that recommend cloud usage optimization opportunities.
* `CLOUD`: integrations with cloud providers.
* `WORKFLOW`: blocks providing workflow composition logic.
* `COLLABORATION`: integrations with project management and collaboration tools.
* `DATA_SOURCES`: integrations with databases, data warehouses, and other data sources.
* `DEVOPS`: integrations with version control and infrastructure-as-code (IaC) tools.
When a user adds a new action to their workflow, they can apply a category filter in the pop-up menu that lists actions. Most blocks belong to one category, but some may belong to multiple.
Since YouTrack is a project management and issue tracking service, the most appropriate category is `COLLABORATION`.
Even basic scaffolding introduces the new block to the OpenOps UI, though the block doesn't do much yet. Here's what you can see at this point if you run `npm run start` and open the OpenOps frontend at [http://localhost:4200/](http://localhost:4200/) in your browser:
;
};
[Creating a Minimal Block](/contributing/creating-a-minimal-block/) demonstrated how to use scaffolding and make a block show up in the OpenOps UI. Let's now see how you would create a fully functional integration with a third-party service.
OpenOps integrates with Jira Cloud and Linear, but what if you use a different service for tracking your cloud optimization opportunities? Let's see how you would create a block that integrates with [JetBrains YouTrack](https://www.jetbrains.com/youtrack/) via its [REST API](https://www.jetbrains.com/help/youtrack/devportal/youtrack-rest-api.html).
The process of developing the YouTrack block will include:
* Scaffolding the block and actions using the OpenOps CLI.
* Implementing custom API key-based authentication that enables the user to set up a connection.
* Developing a simple action that authenticates with YouTrack and retrieves data.
* Developing an advanced action that involves several dynamic, interdependent properties and updates a YouTrack issue.
This is not a step-by-step guide. Instead, it's an overview that highlights prominent parts of the process that you can use to develop your own blocks.
## Scaffolding a new block
To scaffold a new block, you run the following command:
```bash theme={null}
npm run cli blocks create
```
For a YouTrack integration, you would supply the following information to the CLI:
1. `Block name`: `youtrack` (lowercase).
2. `Package name`: leave blank to use the default.
3. `Authentication type`: select `Custom (Custom properties)`.
4. `Create opinionated folder structure with stubs for actions, tests, and common service layer`: select `Yes - Create full folder structure with stubs`.
OpenOps generates a full project template inside `packages/blocks/youtrack/`, including `package.json`, TypeScript configuration files, ESLint and Jest configuration files, an entry point for the block at `src/index.ts`, and a starter test file at `test/index.test.ts`.
Let's take a closer look at the generated files.
### src/index.ts
`src/index.ts` is the entry point to the new block. It uses the `createBlock()` function from the OpenOps block framework to create a new block. This function takes a number of arguments, of which the most important ones are:
* `auth`: authentication implementation for the block. It defines which credentials the user needs to specify in the block's [connection](/cloud-access/access-levels-permissions) properties to authenticate with the API that the block integrates with.
* `actions`: an array that contains the actions that the block exposes. The scaffolded version includes a predefined action that allows making a custom API call to the block's API.
```ts theme={null}
import { createCustomApiCallAction } from '@openops/blocks-common';
import { createBlock, Property } from '@openops/blocks-framework';
import { BlockCategory } from '@openops/shared';
import { youtrackAuth } from './lib/auth';
export const youtrack = createBlock({
displayName: 'Youtrack',
auth: youtrackAuth,
minimumSupportedRelease: '0.20.0',
logoUrl: 'https://static.openops.com/blocks/youtrack.png',
authors: [],
categories: [BlockCategory.FINOPS],
actions: [
createCustomApiCallAction({
baseUrl: () => 'https://api.youtrack.com',
auth: youtrackAuth,
additionalProps: {
documentation: Property.MarkDown({
value:
'For more information, visit the [Youtrack API documentation](https://docs.youtrack.com/reference/introduction).',
}),
},
}),
],
triggers: [],
});
```
### src/lib/auth.ts
Scaffolding generates a placeholder authentication implementation in a separate file. It uses the `CustomAuth()` helper function from the OpenOps block framework. The function takes several parameters, of which the most important ones are:
* `props`: an object that defines the inputs required to authenticate with the service that the block integrates with.
* `validate`: a function for optional validation of the inputs defined in `props`.
```ts theme={null}
import { BlockAuth, Property } from '@openops/blocks-framework';
export const youtrackAuth = BlockAuth.CustomAuth({
authProviderKey: 'youtrack',
authProviderDisplayName: 'Youtrack',
authProviderLogoUrl: 'https://static.openops.com/blocks/youtrack.png',
description: 'Configure your Youtrack connection',
required: true,
props: {
apiKey: Property.SecretText({
displayName: 'API Key',
required: true,
}),
baseUrl: Property.ShortText({
displayName: 'Base URL',
description: 'The base URL for Youtrack API',
required: true,
}),
},
validate: async ({ auth }) => {
// Add validation logic here
return { valid: true };
},
});
```
### Project files
OpenOps uses [Nx](https://nx.dev/) as its build system. The `project.json` file defines how the new block is built, tested, and linted within the Nx workspace. It specifies the source root, output path, TypeScript configuration, package entry points, and assets. It also declares executors for build (`@nx/js:tsc`), test (`@nx/jest:jest`), and lint (`@nx/eslint:lint`).
```json theme={null}
{
"name": "blocks-youtrack",
"$schema": "../../../node_modules/nx/schemas/project-schema.json",
"sourceRoot": "packages/blocks/youtrack/src",
"projectType": "library",
"tags": [],
"targets": {
"build": {
"executor": "@nx/js:tsc",
"outputs": ["{options.outputPath}"],
"options": {
"outputPath": "dist/packages/blocks/youtrack",
"tsConfig": "packages/blocks/youtrack/tsconfig.lib.json",
"packageJson": "packages/blocks/youtrack/package.json",
"main": "packages/blocks/youtrack/src/index.ts",
"assets": ["packages/blocks/youtrack/*.md"],
"buildableProjectDepsInPackageJsonType": "dependencies",
"updateBuildableProjectDepsInPackageJson": true
}
},
"test": {
"executor": "@nx/jest:jest",
"outputs": ["{workspaceRoot}/coverage/{projectRoot}"],
"options": {
"jestConfig": "packages/blocks/youtrack/jest.config.ts"
}
},
"lint": {
"executor": "@nx/eslint:lint",
"outputs": ["{options.outputFile}"]
}
}
}
```
`package.json` is a minimal metadata file that declares the block's name and version within the Nx workspace. Unlike typical npm packages, this file isn't meant for publication to the npm registry. Instead, it helps Nx identify the project and marks the block as a versioned unit within the larger repository.
```json theme={null}
{
"name": "@openops/block-youtrack",
"version": "0.0.1"
}
```
If your block requires additional dependencies, such as an SDK for the service you're integrating with, you can add them to the `dependencies` section of `package.json`.
### Test files
`test/index.test.ts` is a stub Jest test fixture that includes a few sample tests for the block:
```ts theme={null}
import { youtrack } from '../src/index';
describe('block declaration tests', () => {
test('should return block with correct authentication', () => {
expect(youtrack.auth).toMatchObject({
type: 'CUSTOM_AUTH',
required: true,
authProviderKey: 'youtrack',
authProviderDisplayName: 'Youtrack',
authProviderLogoUrl: 'https://static.openops.com/blocks/youtrack.png',
});
});
test('should return block with correct number of actions', () => {
expect(Object.keys(youtrack.actions()).length).toBe(1);
expect(youtrack.actions()).toMatchObject({
custom_api_call: {
name: 'custom_api_call',
requireAuth: true,
},
});
});
});
```
You can run these tests using `nx test blocks-youtrack`.
There's also a Jest configuration file, `jest.config.ts`, which inherits shared settings from the OpenOps Jest preset, references a TypeScript config file, defines recognized file extensions, and specifies where to store code coverage reports:
```ts theme={null}
export default {
displayName: 'blocks-youtrack',
preset: '../../../jest.preset.js',
setupFiles: ['../../../jest.env.js'],
testEnvironment: 'node',
transform: {
'^.+\\.[tj]s$': ['ts-jest', { tsconfig: '/tsconfig.spec.json' }],
},
moduleFileExtensions: ['ts', 'js', 'html'],
coverageDirectory: '../../../coverage/packages/blocks/youtrack',
};
```
### TypeScript configuration files
Scaffolding generates three TypeScript configuration files: `tsconfig.json`, `tsconfig.lib.json`, and `tsconfig.spec.json`.
`tsconfig.json` is the base config for the block. It extends the workspace's root `tsconfig.base.json` and enforces strict compiler options but doesn't include any source files directly. Instead, it references the other two config files, serving as an entry point for both:
```json theme={null}
{
"extends": "../../../tsconfig.base.json",
"compilerOptions": {
"module": "commonjs",
"forceConsistentCasingInFileNames": true,
"strict": true,
"noImplicitOverride": true,
"noPropertyAccessFromIndexSignature": true,
"noImplicitReturns": true,
"noFallthroughCasesInSwitch": true
},
"files": [],
"include": [],
"references": [
{
"path": "./tsconfig.lib.json"
},
{
"path": "./tsconfig.spec.json"
}
]
}
```
`tsconfig.lib.json` applies to the block's source code. It outputs compiled files to `dist/out-tsc`, generates type declarations, and includes only non-test TypeScript files under `src/`:
```json theme={null}
{
"extends": "./tsconfig.json",
"compilerOptions": {
"module": "commonjs",
"outDir": "../../../dist/out-tsc",
"declaration": true,
"types": ["node"]
},
"exclude": ["jest.config.ts", "src/**/*.spec.ts", "src/**/*.test.ts"],
"include": ["src/**/*.ts"]
}
```
`tsconfig.spec.json` is tailored for testing. It includes test and declaration files and configures Jest typings:
```json theme={null}
{
"extends": "./tsconfig.json",
"compilerOptions": {
"outDir": "../../../dist/out-tsc",
"module": "commonjs",
"types": ["jest", "node"]
},
"include": [
"jest.config.ts",
"src/**/*.test.ts",
"src/**/*.spec.ts",
"src/**/*.d.ts"
]
}
```
### Other files
`.eslintrc.json` defines JavaScript and TypeScript linting behavior for the block, extending the OpenOps repository's root ESLint configuration. The `overrides` section provides placeholders for block-specific linting rules if you want to introduce them.
`README.md` stubs out documentation for the block.
## Post-scaffolding cleanup
OpenOps may alter the spelling of your block's display name during scaffolding, so review this and run search and replace if needed. For example, with YouTrack it didn't use the proper casing for the product name, generating "Youtrack" instead of "YouTrack".
### Product logo
OpenOps stores logo assets within the project at `packages/react-ui/public/blocks/`. When contributing an integration, add your product's logo file (PNG or SVG format) directly to this directory and reference it using the path `/blocks/[product-name].png` in your integration code.
For example, if your product is called YouTrack, add `youtrack.png` to `packages/react-ui/public/blocks/` and set the logo URL to `/blocks/youtrack.png` in your integration definition. This ensures your logo is included in the PR and will work immediately without requiring additional steps.
### Categories
When scaffolding a block, OpenOps sets the block's `categories` property to `[BlockCategory.FINOPS]`. The `BlockCategory` enum defines the categories that a block can belong to, such as:
* `FINOPS`: integrations with tools that recommend cloud usage optimization opportunities.
* `CLOUD`: integrations with cloud providers.
* `WORKFLOW`: blocks providing workflow composition logic.
* `COLLABORATION`: integrations with project management and collaboration tools.
* `DATA_SOURCES`: integrations with databases, data warehouses, and other data sources.
* `DEVOPS`: integrations with version control and infrastructure-as-code (IaC) tools.
When a user adds a new action to their workflow, they can apply a category filter in the pop-up menu that lists actions. Most blocks belong to one category, but some may belong to multiple.
Since YouTrack is a project management and issue tracking service, the most appropriate category is `COLLABORATION`.
Even basic scaffolding introduces the new block to the OpenOps UI, though the block doesn't do much yet. Here's what you can see at this point if you run `npm run start` and open the OpenOps frontend at [http://localhost:4200/](http://localhost:4200/) in your browser:
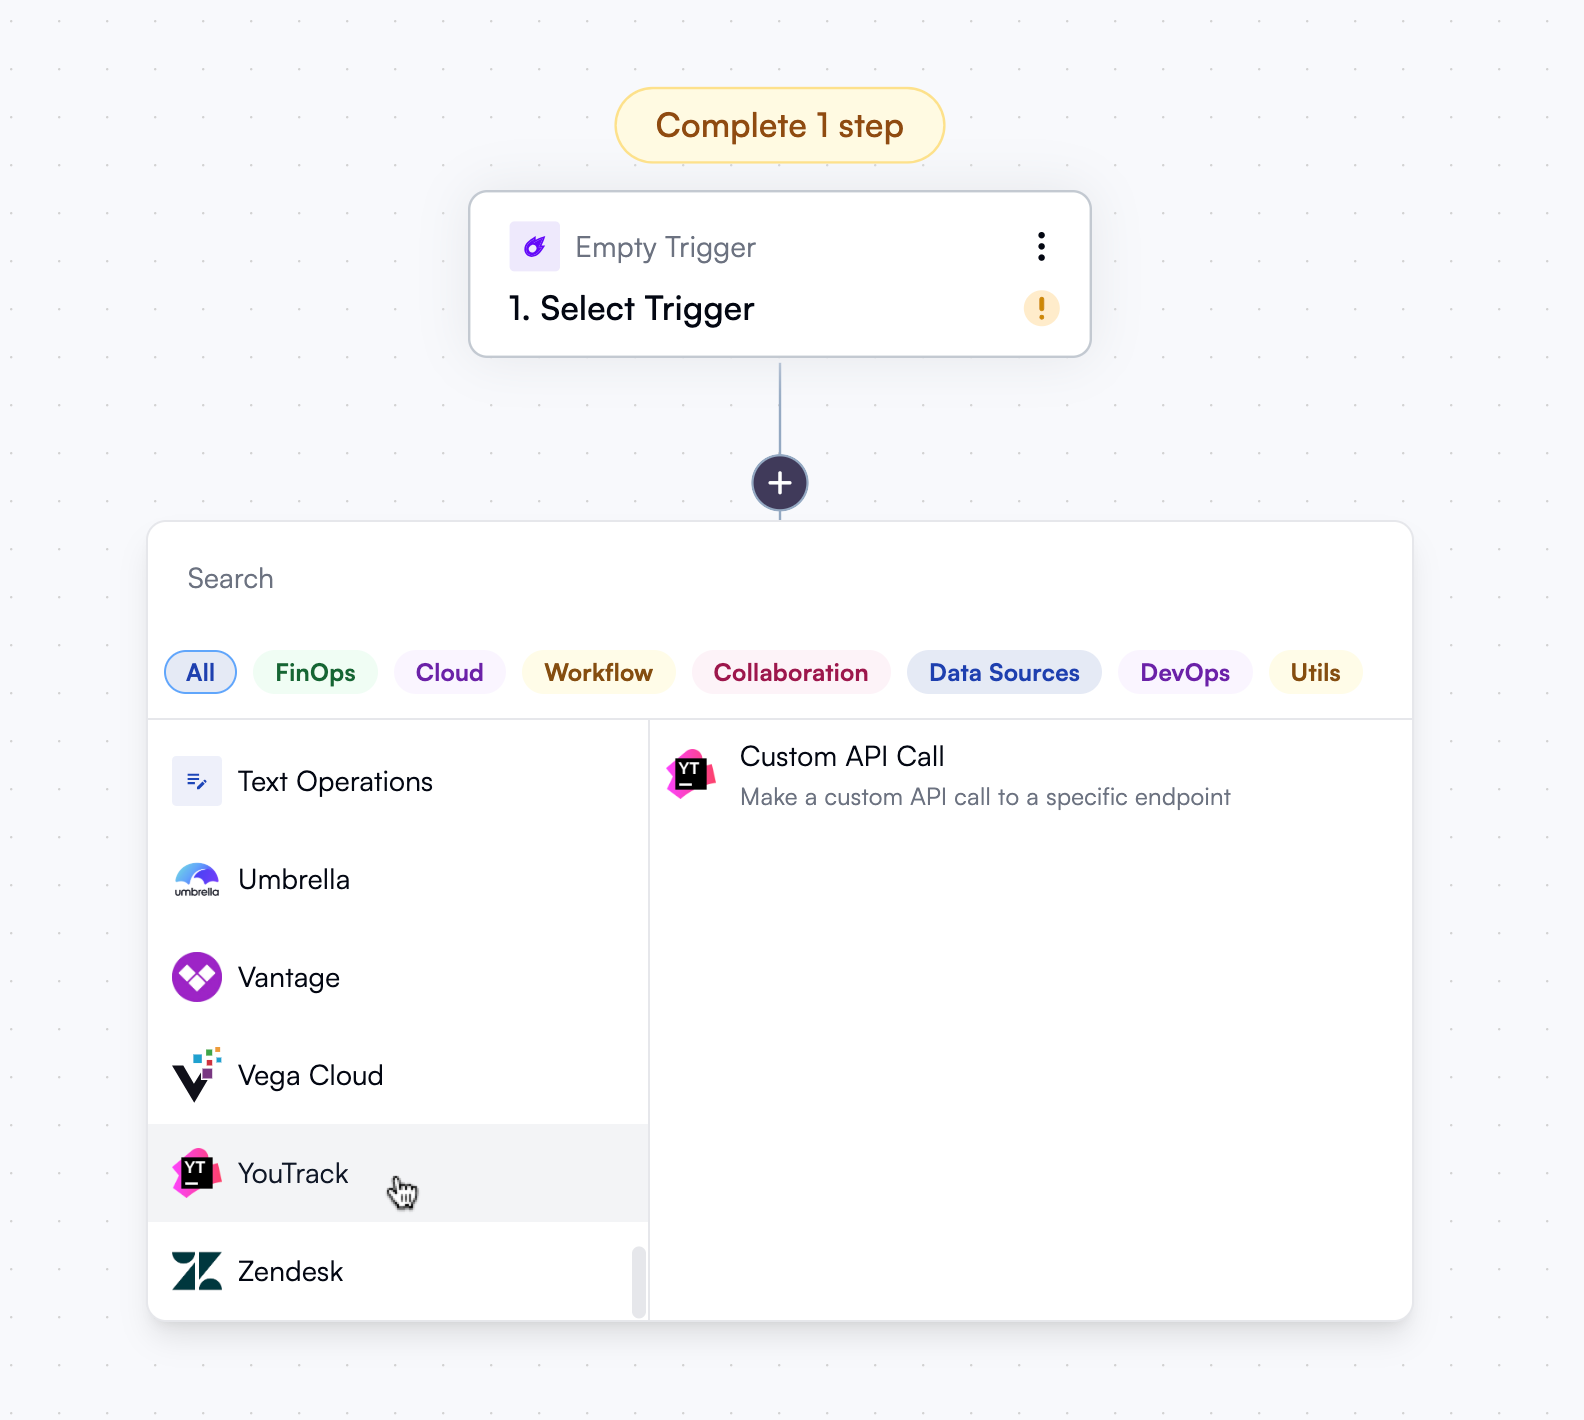 ## Implementing authentication
Now that you have a block, you could start building its actions. However, unless your block interacts with a publicly accessible API, you need to provide the user with a way to authenticate with the API that your block is built on. How you implement authentication defines what the user sees when they try to create a new [connection](/cloud-access/access-levels-permissions) for your block.
Scaffolding generated a placeholder authentication implementation and referenced it from the YouTrack block's entry point. What's left is to implement the actual authentication logic in the `src/lib/auth.ts` file. As a reminder, here's what the scaffolded file initially looked like:
```ts theme={null}
import { BlockAuth, Property } from '@openops/blocks-framework';
export const youtrackAuth = BlockAuth.CustomAuth({
authProviderKey: 'youtrack',
authProviderDisplayName: 'Youtrack',
authProviderLogoUrl: 'https://static.openops.com/blocks/youtrack.png',
description: 'Configure your Youtrack connection',
required: true,
props: {
apiKey: Property.SecretText({
displayName: 'API Key',
required: true,
}),
baseUrl: Property.ShortText({
displayName: 'Base URL',
description: 'The base URL for Youtrack API',
required: true,
}),
},
validate: async ({ auth }) => {
// Add validation logic here
return { valid: true };
},
});
```
As you can see, this block uses the `CustomAuth()` helper function to define YouTrack authentication. There are other [types of authentication](/contributing/authentication/), but `CustomAuth()` works best for YouTrack because, in addition to an API key, the user needs to specify a base URL. YouTrack can be cloud-hosted by JetBrains, with a unique base URL for each cloud instance, or self-hosted by customers.
The values of the `authProviderKey`, `authProviderDisplayName`, `authProviderLogoUrl`, and `required` properties are fine as they are. What needs to be changed are the values of `props`, `validate`, and `description`. Let's start with `props`.
### Defining connection properties
`props` defines the inputs required to authenticate with the service provider that the block integrates with. Each of these inputs is an OpenOps UI component: it can be a regular or masked input field, a checkbox, a dropdown, and more. This component library is used not only for defining connections but also for defining the actions that a block exposes.
The first property, `apiKey`, is for the user to provide a YouTrack API key (a.k.a. permanent token). The scaffolded version of this property uses the `SecretText` property type, which is a masked input field, and it's exactly what we need for this kind of data. Let's expand the scaffolded version of the property to include a description:
```ts theme={null}
apiKey: Property.SecretText({
required: true,
displayName: 'API key',
description:
'The API key (permanent token) for your YouTrack installation.',
})
```
The second property, `apiUrl`, is for the user to provide the base URL of their YouTrack instance. This property is a regular input field. The scaffolded version is a good start, but we can improve it by adding a clearer description, providing a default value, and using a predefined validation rule for URLs:
```ts theme={null}
apiUrl: Property.ShortText({
displayName: 'Base URL',
description:
'The base URL of your YouTrack installation without a trailing slash.',
required: true,
validators: [Validators.url],
defaultValue: 'https://your-instance.myjetbrains.com/youtrack',
})
```
Note that for this to compile, we need to extend the import from the `@openops/blocks-framework` package to include the `Validators` object:
```ts theme={null}
import { BlockAuth, Property, Validators } from '@openops/blocks-framework';
```
`Validators.url` is not the only predefined validation rule. OpenOps provides a set of ready-to-use validation rules for value ranges, dates, emails, phone numbers, image formats, and more.
### Adding custom validation
Adding predefined validation rules to properties is one way to enforce a specific format or pattern for user input. You can also add custom validation rules using the `validate()` function.
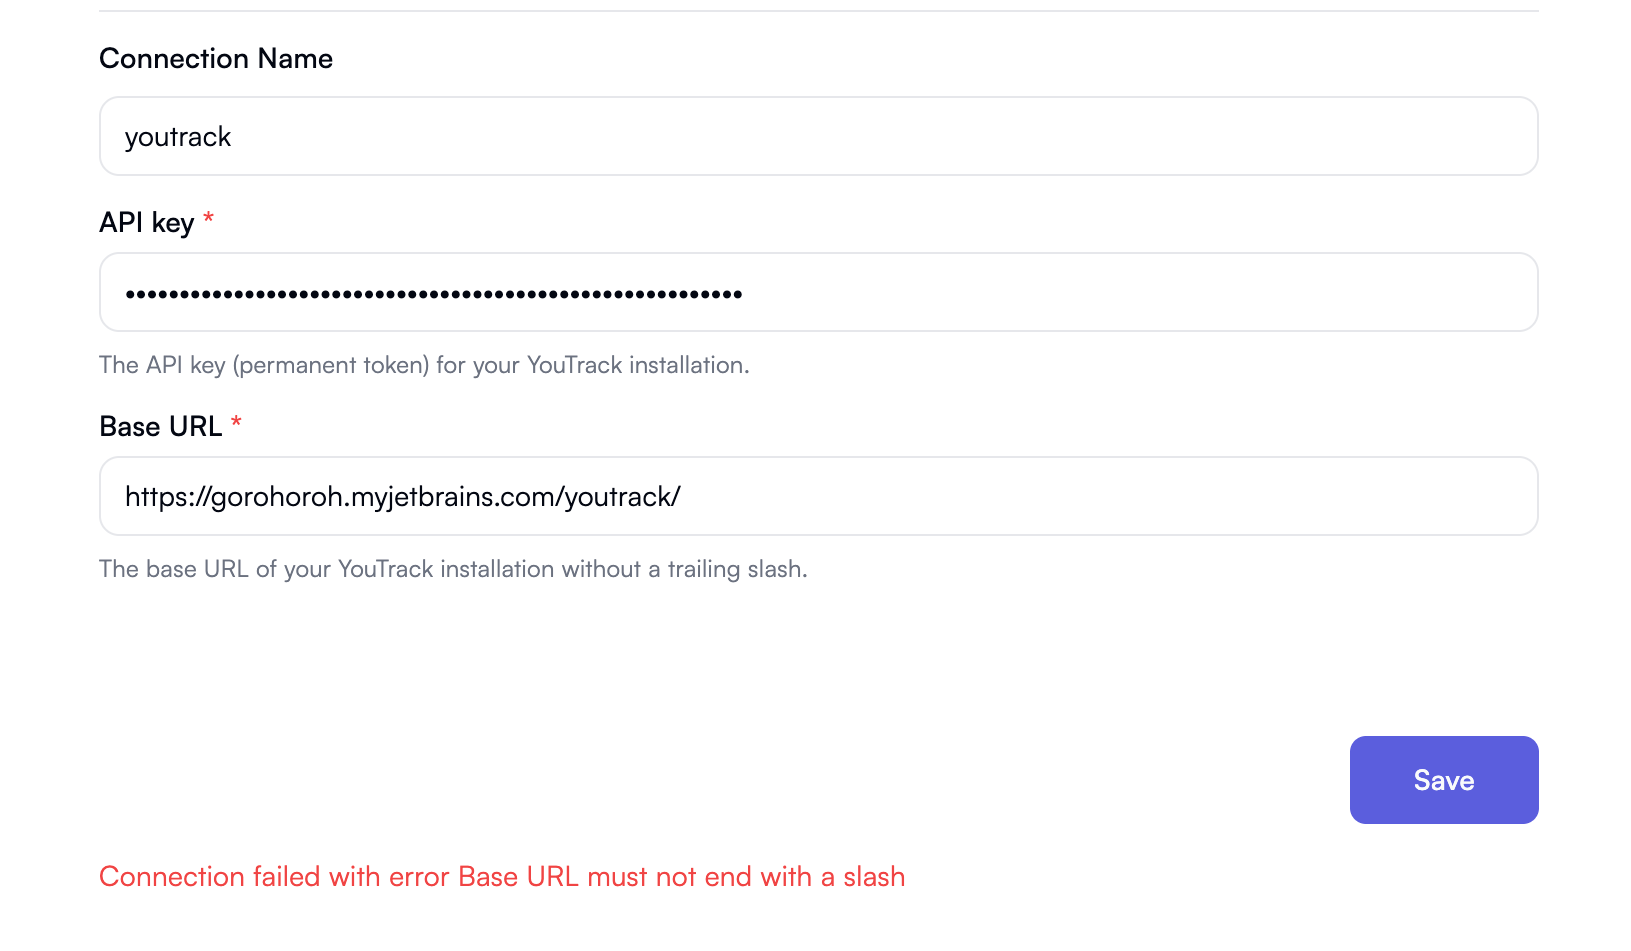
Some blocks, such as [Linear](https://github.com/openops-cloud/openops/blob/7fad45c16a0ab4a01eaa5a2b9b50d304effc9f83/packages/blocks/linear/src/index.ts#L29C1-L39C5), use `validate()` to ensure that the API key conforms to a specific format. With YouTrack, there's no need for this. Instead, it makes sense to check that the base URL doesn't have a trailing slash, since YouTrack doesn't normalize URLs with double slashes. Here's how this could be done:
```ts theme={null}
validate: async ({ auth }) => {
if (auth.apiUrl.endsWith('/')) {
return {
valid: false,
error: 'Base URL must not end with a slash',
};
} else {
return { valid: true };
}
}
```
The `auth` object passed to `validate()` contains the values of all the properties provided by the user. This lets you introduce additional checks on `auth.apiUrl`, which holds the entered base URL.
You could also use `validate()` to try authenticating the user with a given API key. For example, the [ServiceNow](https://github.com/openops-cloud/openops/blob/7fad45c16a0ab4a01eaa5a2b9b50d304effc9f83/packages/blocks/servicenow/src/lib/auth.ts#L34C1-L54C5) and [Umbrella](https://github.com/openops-cloud/openops/blob/7fad45c16a0ab4a01eaa5a2b9b50d304effc9f83/packages/blocks/anodot/src/lib/anodot-auth-property.ts#L37C1-L64C5) blocks make sample requests to their APIs to let the user know immediately if authentication fails.
### Adding a Markdown description
When a user sets up a connection, they may not immediately know how to obtain an API key or another value required during connection setup.
To guide them, use the `description` property. The best part about this property is that it isn't limited to plain text — you can provide a Markdown-formatted string, and OpenOps will render it in the connection UI, between the title and the first input.
For YouTrack, a Markdown description could look like this:
```ts theme={null}
const markdown = `
To get your YouTrack API key:
1. Go to your YouTrack installation.
2. In the navigation menu, click your user profile icon, then click **Profile**.
3. Open the **Account Security** tab.
4. Under **Tokens**, click **New token**.
5. Give the new token a name and select **YouTrack** in the list of scopes.
6. Click **Create**.
7. Copy the token to your clipboard.`;
```
When providing a description as a separate variable, as shown here, remember to assign that variable to the `description` property:
```ts theme={null}
description: markdown
```
### Adding an interface
The last step in the `src/lib/auth.ts` file is to define an interface for the two authentication properties. This interface will be imported into the files that define the block's actions to provide typing for the action parameters.
For YouTrack authentication, the interface could look like this:
```ts theme={null}
export interface YouTrackAuth {
apiUrl: string;
apiKey: string;
}
```
### The resulting authentication code and connection UI
After implementing authentication, the `src/lib/auth.ts` file looks like this:
```ts theme={null}
import { BlockAuth, Property, Validators } from '@openops/blocks-framework';
const markdown = `
To get your YouTrack API key:
1. Go to your YouTrack installation.
2. In the navigation menu, click your user profile icon, then click **Profile**.
3. Open the **Account Security** tab.
4. Under **Tokens**, click **New token**.
5. Give the new token a name and select **YouTrack** in the list of scopes.
6. Click **Create**.
7. Copy the token to your clipboard.`;
export const youtrackAuth = BlockAuth.CustomAuth({
required: true,
authProviderKey: 'youtrack',
authProviderDisplayName: 'YouTrack',
authProviderLogoUrl:
'https://resources.jetbrains.com/storage/products/company/brand/logos/YouTrack_icon.png',
description: markdown,
props: {
apiKey: Property.SecretText({
required: true,
displayName: 'API key',
description:
'The API key (permanent token) for your YouTrack installation.',
}),
apiUrl: Property.ShortText({
displayName: 'Base URL',
description:
'The base URL of your YouTrack installation without a trailing slash.',
required: true,
validators: [Validators.url],
defaultValue: 'https://your-instance.myjetbrains.com/youtrack',
}),
},
validate: async ({ auth }) => {
if (auth.apiUrl.endsWith('/')) {
return {
valid: false,
error: 'Base URL must not end with a slash',
};
} else {
return { valid: true };
}
},
});
export interface YouTrackAuth {
apiUrl: string;
apiKey: string;
}
```
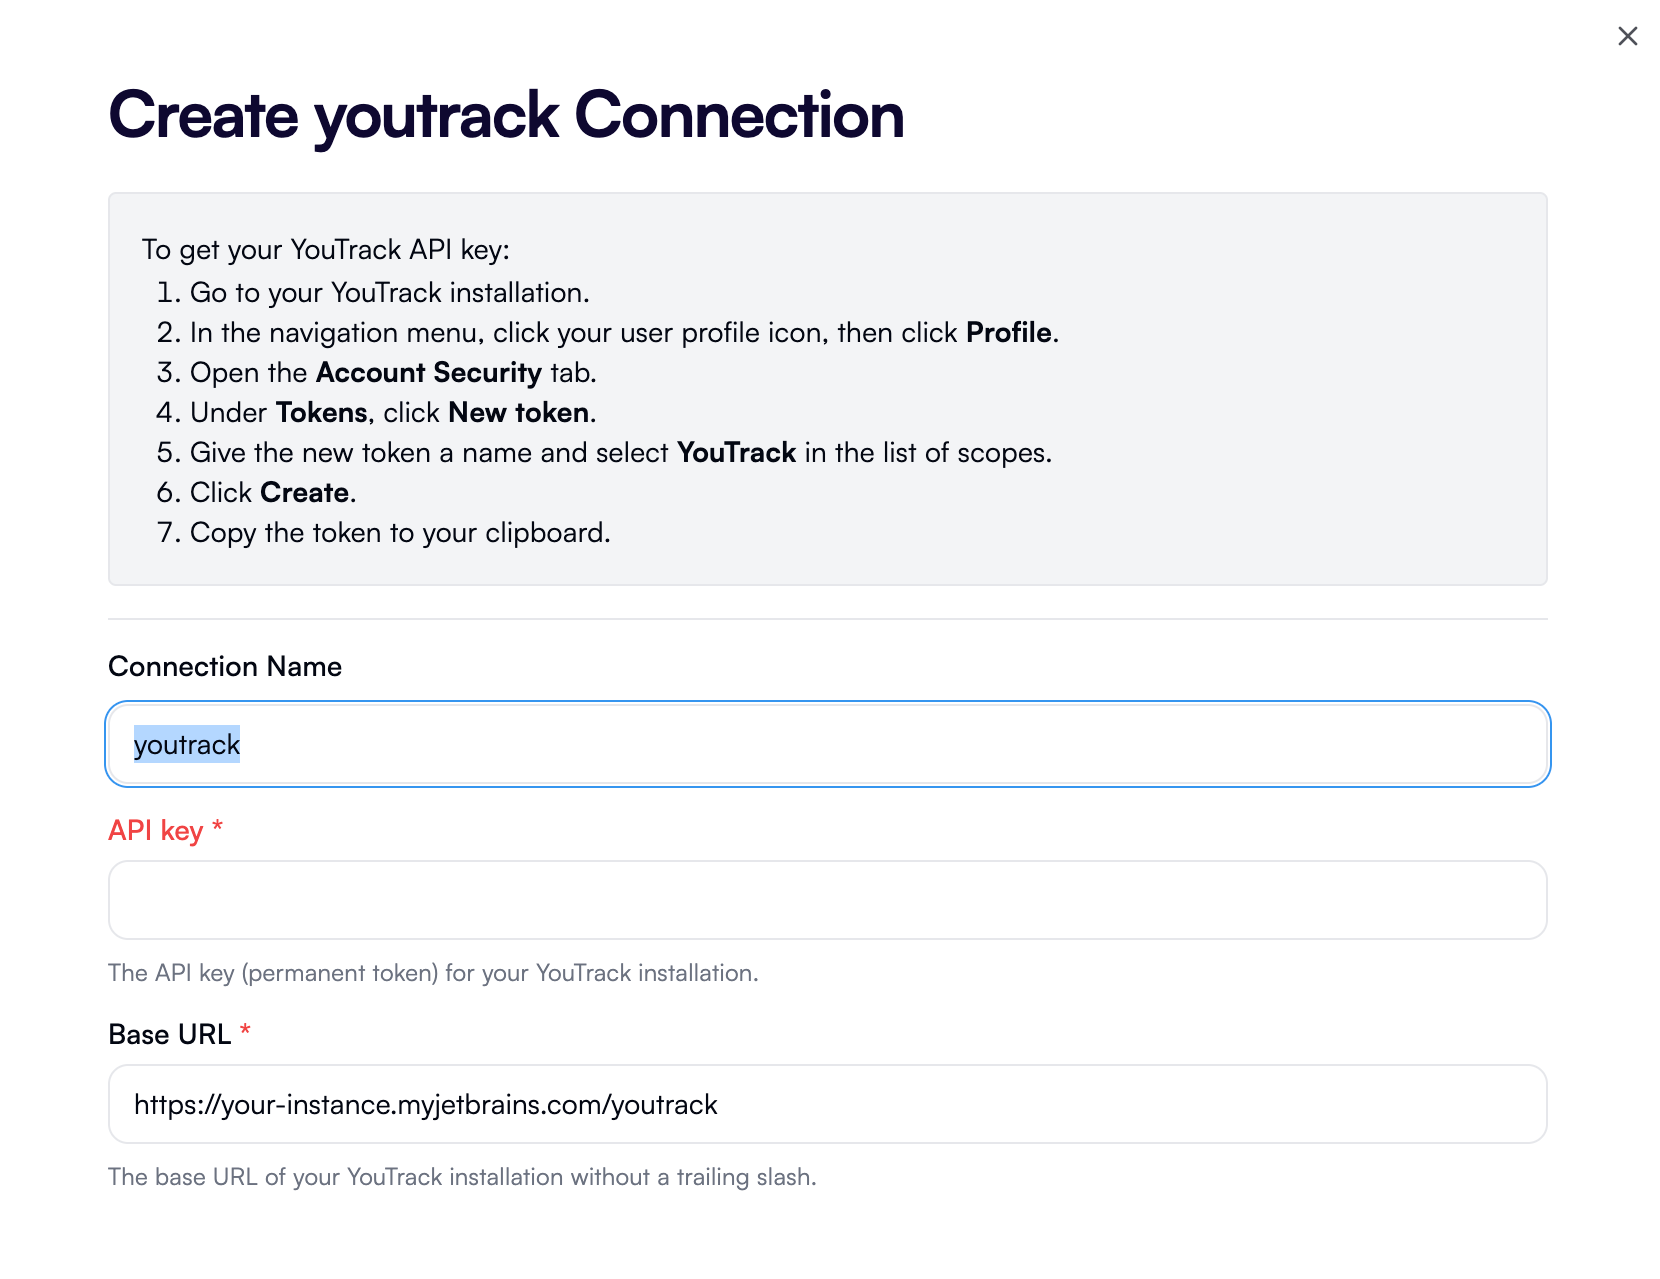
With this code, if the user creates a new connection in OpenOps, they will see a connection type for YouTrack:
When they click the YouTrack logo, a connection dialog appears with a properly rendered Markdown description and three input fields. The **Connection name** field is predefined and prefilled with a suggested name for the connection. The other two fields, **API key** and **Base URL**, are the properties we defined earlier:
## Implementing authentication
Now that you have a block, you could start building its actions. However, unless your block interacts with a publicly accessible API, you need to provide the user with a way to authenticate with the API that your block is built on. How you implement authentication defines what the user sees when they try to create a new [connection](/cloud-access/access-levels-permissions) for your block.
Scaffolding generated a placeholder authentication implementation and referenced it from the YouTrack block's entry point. What's left is to implement the actual authentication logic in the `src/lib/auth.ts` file. As a reminder, here's what the scaffolded file initially looked like:
```ts theme={null}
import { BlockAuth, Property } from '@openops/blocks-framework';
export const youtrackAuth = BlockAuth.CustomAuth({
authProviderKey: 'youtrack',
authProviderDisplayName: 'Youtrack',
authProviderLogoUrl: 'https://static.openops.com/blocks/youtrack.png',
description: 'Configure your Youtrack connection',
required: true,
props: {
apiKey: Property.SecretText({
displayName: 'API Key',
required: true,
}),
baseUrl: Property.ShortText({
displayName: 'Base URL',
description: 'The base URL for Youtrack API',
required: true,
}),
},
validate: async ({ auth }) => {
// Add validation logic here
return { valid: true };
},
});
```
As you can see, this block uses the `CustomAuth()` helper function to define YouTrack authentication. There are other [types of authentication](/contributing/authentication/), but `CustomAuth()` works best for YouTrack because, in addition to an API key, the user needs to specify a base URL. YouTrack can be cloud-hosted by JetBrains, with a unique base URL for each cloud instance, or self-hosted by customers.
The values of the `authProviderKey`, `authProviderDisplayName`, `authProviderLogoUrl`, and `required` properties are fine as they are. What needs to be changed are the values of `props`, `validate`, and `description`. Let's start with `props`.
### Defining connection properties
`props` defines the inputs required to authenticate with the service provider that the block integrates with. Each of these inputs is an OpenOps UI component: it can be a regular or masked input field, a checkbox, a dropdown, and more. This component library is used not only for defining connections but also for defining the actions that a block exposes.
The first property, `apiKey`, is for the user to provide a YouTrack API key (a.k.a. permanent token). The scaffolded version of this property uses the `SecretText` property type, which is a masked input field, and it's exactly what we need for this kind of data. Let's expand the scaffolded version of the property to include a description:
```ts theme={null}
apiKey: Property.SecretText({
required: true,
displayName: 'API key',
description:
'The API key (permanent token) for your YouTrack installation.',
})
```
The second property, `apiUrl`, is for the user to provide the base URL of their YouTrack instance. This property is a regular input field. The scaffolded version is a good start, but we can improve it by adding a clearer description, providing a default value, and using a predefined validation rule for URLs:
```ts theme={null}
apiUrl: Property.ShortText({
displayName: 'Base URL',
description:
'The base URL of your YouTrack installation without a trailing slash.',
required: true,
validators: [Validators.url],
defaultValue: 'https://your-instance.myjetbrains.com/youtrack',
})
```
Note that for this to compile, we need to extend the import from the `@openops/blocks-framework` package to include the `Validators` object:
```ts theme={null}
import { BlockAuth, Property, Validators } from '@openops/blocks-framework';
```
`Validators.url` is not the only predefined validation rule. OpenOps provides a set of ready-to-use validation rules for value ranges, dates, emails, phone numbers, image formats, and more.
### Adding custom validation
Adding predefined validation rules to properties is one way to enforce a specific format or pattern for user input. You can also add custom validation rules using the `validate()` function.
Some blocks, such as [Linear](https://github.com/openops-cloud/openops/blob/7fad45c16a0ab4a01eaa5a2b9b50d304effc9f83/packages/blocks/linear/src/index.ts#L29C1-L39C5), use `validate()` to ensure that the API key conforms to a specific format. With YouTrack, there's no need for this. Instead, it makes sense to check that the base URL doesn't have a trailing slash, since YouTrack doesn't normalize URLs with double slashes. Here's how this could be done:
```ts theme={null}
validate: async ({ auth }) => {
if (auth.apiUrl.endsWith('/')) {
return {
valid: false,
error: 'Base URL must not end with a slash',
};
} else {
return { valid: true };
}
}
```
The `auth` object passed to `validate()` contains the values of all the properties provided by the user. This lets you introduce additional checks on `auth.apiUrl`, which holds the entered base URL.
You could also use `validate()` to try authenticating the user with a given API key. For example, the [ServiceNow](https://github.com/openops-cloud/openops/blob/7fad45c16a0ab4a01eaa5a2b9b50d304effc9f83/packages/blocks/servicenow/src/lib/auth.ts#L34C1-L54C5) and [Umbrella](https://github.com/openops-cloud/openops/blob/7fad45c16a0ab4a01eaa5a2b9b50d304effc9f83/packages/blocks/anodot/src/lib/anodot-auth-property.ts#L37C1-L64C5) blocks make sample requests to their APIs to let the user know immediately if authentication fails.
### Adding a Markdown description
When a user sets up a connection, they may not immediately know how to obtain an API key or another value required during connection setup.
To guide them, use the `description` property. The best part about this property is that it isn't limited to plain text — you can provide a Markdown-formatted string, and OpenOps will render it in the connection UI, between the title and the first input.
For YouTrack, a Markdown description could look like this:
```ts theme={null}
const markdown = `
To get your YouTrack API key:
1. Go to your YouTrack installation.
2. In the navigation menu, click your user profile icon, then click **Profile**.
3. Open the **Account Security** tab.
4. Under **Tokens**, click **New token**.
5. Give the new token a name and select **YouTrack** in the list of scopes.
6. Click **Create**.
7. Copy the token to your clipboard.`;
```
When providing a description as a separate variable, as shown here, remember to assign that variable to the `description` property:
```ts theme={null}
description: markdown
```
### Adding an interface
The last step in the `src/lib/auth.ts` file is to define an interface for the two authentication properties. This interface will be imported into the files that define the block's actions to provide typing for the action parameters.
For YouTrack authentication, the interface could look like this:
```ts theme={null}
export interface YouTrackAuth {
apiUrl: string;
apiKey: string;
}
```
### The resulting authentication code and connection UI
After implementing authentication, the `src/lib/auth.ts` file looks like this:
```ts theme={null}
import { BlockAuth, Property, Validators } from '@openops/blocks-framework';
const markdown = `
To get your YouTrack API key:
1. Go to your YouTrack installation.
2. In the navigation menu, click your user profile icon, then click **Profile**.
3. Open the **Account Security** tab.
4. Under **Tokens**, click **New token**.
5. Give the new token a name and select **YouTrack** in the list of scopes.
6. Click **Create**.
7. Copy the token to your clipboard.`;
export const youtrackAuth = BlockAuth.CustomAuth({
required: true,
authProviderKey: 'youtrack',
authProviderDisplayName: 'YouTrack',
authProviderLogoUrl:
'https://resources.jetbrains.com/storage/products/company/brand/logos/YouTrack_icon.png',
description: markdown,
props: {
apiKey: Property.SecretText({
required: true,
displayName: 'API key',
description:
'The API key (permanent token) for your YouTrack installation.',
}),
apiUrl: Property.ShortText({
displayName: 'Base URL',
description:
'The base URL of your YouTrack installation without a trailing slash.',
required: true,
validators: [Validators.url],
defaultValue: 'https://your-instance.myjetbrains.com/youtrack',
}),
},
validate: async ({ auth }) => {
if (auth.apiUrl.endsWith('/')) {
return {
valid: false,
error: 'Base URL must not end with a slash',
};
} else {
return { valid: true };
}
},
});
export interface YouTrackAuth {
apiUrl: string;
apiKey: string;
}
```
With this code, if the user creates a new connection in OpenOps, they will see a connection type for YouTrack:
When they click the YouTrack logo, a connection dialog appears with a properly rendered Markdown description and three input fields. The **Connection name** field is predefined and prefilled with a suggested name for the connection. The other two fields, **API key** and **Base URL**, are the properties we defined earlier:
 If the user enters a base URL with a trailing slash, the connection dialog executes the validation logic defined above and shows an error message:
 ## Adding a simple action
We have a block, we've implemented authentication, and now it's time to move on to the core of every integration: actions.
### Removing the default action
When you scaffold a block, OpenOps adds an action called **Custom API Call**. While we could tweak it to work for YouTrack, let's instead remove it and create a new action from scratch.
After removing the scaffolded action, the `src/index.ts` file looks like this:
```ts theme={null}
import { createBlock } from '@openops/blocks-framework';
import { BlockCategory } from '@openops/shared';
import { youtrackAuth } from './lib/auth';
export const youtrack = createBlock({
displayName: 'YouTrack',
auth: youtrackAuth,
minimumSupportedRelease: '0.20.0',
logoUrl:
'https://resources.jetbrains.com/storage/products/company/brand/logos/YouTrack_icon.png',
authors: [],
categories: [BlockCategory.COLLABORATION],
actions: [],
triggers: [],
});
```
The `actions` array is now empty. Once we create an action, we'll need to add a reference to it there.
### Scaffolding the new action
OpenOps provides scaffolding for actions as well, so let's run this in the terminal:
```bash theme={null}
npm run cli actions create
```
The CLI asks four questions to define the new action:
1. `Enter the block folder name`: the folder where the block for the new action resides. For the existing YouTrack block, the value should be `youtrack`.
2. `Enter the action display name`: a human-readable name for the action that users will see in the UI. It's also used to name the action's file. In this case, we want an action that lists issues in a YouTrack instance, so let's call it `Get all issues`.
3. `Enter the action description`: a brief, informative text shown in the UI to explain the action's function and purpose. Let's enter `Retrieves all issues from a YouTrack instance`.
4. `Does this action modify data or state (e.g., create, update, delete)?`: enter `n` for "No" as this is a read-only action.
With these values, the CLI scaffolds the action in a new file named `get-all-issues.ts` in the YouTrack block's `/src/lib/actions` directory. The file initially looks like this:
```ts theme={null}
import { createAction, Property } from '@openops/blocks-framework';
export const getAllIssues = createAction({
isWriteAction: false,
name: 'getAllIssues',
displayName: 'Get all issues',
description: 'Retrieves all issues from a YouTrack instance',
props: {},
async run() {
// Action logic here
},
});
```
As you can see, the scaffolding uses the `createAction()` helper function to define the action. The values of `displayName` and `description` are the same as the values provided in the CLI.
The `props` property is empty, which means there are no configuration options for the user to set. For this first action, that's fine; we'll add another action with configuration options later.
### Adding action execution logic
The scaffolded action has two prominent omissions:
1. It doesn't have an `auth` property referencing the block's authentication logic implemented earlier.
2. Its `run()` function, which should define the action logic, is empty.
Let's fix these two issues by replacing the scaffolded version with the following:
```ts theme={null}
import { httpClient, HttpMethod } from '@openops/blocks-common';
import { createAction } from '@openops/blocks-framework';
import { youtrackAuth, YouTrackAuth } from '../auth';
export const getAllIssues = createAction({
isWriteAction: false,
name: 'getAllIssues',
displayName: 'Get all issues',
description: 'Retrieves all issues from a YouTrack instance',
props: {},
auth: youtrackAuth,
async run(context) {
const endpoint =
'/api/issues?query=for:%20me%20%23Unresolved%20&fields=id,project(shortName),numberInProject,summary,description&$top=10';
const auth = context.auth as YouTrackAuth;
const requestUrl = `${auth.apiUrl}${endpoint}`;
const response = await httpClient.sendRequest({
method: HttpMethod.GET,
url: requestUrl,
headers: {
Authorization: `Bearer ${auth.apiKey}`,
Accept: 'application/json',
'Content-Type': 'application/json',
},
});
return {
_debug: {
request: {
method: 'GET',
requestUrl,
},
response: {
status: response.status,
},
},
issues: response.body,
};
},
});
```
Here's what's changed:
1. The action now has an `auth` property that references the block's authentication logic. Both the authentication logic and its interface are imported from the block's `auth.ts` file.
2. The `run()` function now makes a request to a YouTrack API endpoint to retrieve the first 10 unresolved issues.
3. To make the API call, the `run()` function uses the imported `httpClient` constant, which is an OpenOps-provided wrapper around the Axios HTTP client. Some blocks, such as [Linear](http://github.com/openops-cloud/openops/blob/main/packages/blocks/linear/src/lib/common/client.ts) and [Jira](https://github.com/openops-cloud/openops/blob/main/packages/blocks/jira-cloud/src/lib/common/index.ts), create separate functions for making HTTP requests to their APIs. This can be useful for providing extra error handling or leveraging existing SDKs, but for YouTrack, we can just use `httpClient` directly.
4. The `return` statement of the `run()` function defines what the user sees as the output of the action. The format of the returned object is up to the block author. In this case, we're returning an object with two properties: `_debug` and `issues`. The `_debug` property is a container for debugging information useful during development. The `issues` property is an array of issues retrieved from the YouTrack instance.
### Referencing the action from the block definition
Before testing the action, we need to add it to the block's definition. In the `src/index.ts` file, we need to import the action and add it to the `actions` array:
```ts theme={null}
import { createBlock } from '@openops/blocks-framework';
import { BlockCategory } from '@openops/shared';
import { getAllIssues } from './lib/actions/get-all-issues';
import { youtrackAuth } from './lib/auth';
export const youtrack = createBlock({
displayName: 'YouTrack',
auth: youtrackAuth,
minimumSupportedRelease: '0.20.0',
logoUrl:
'https://resources.jetbrains.com/storage/products/company/brand/logos/YouTrack_icon.png',
authors: [],
categories: [BlockCategory.COLLABORATION],
actions: [getAllIssues],
triggers: [],
});
```
### Testing the action
Let's see what happens in the OpenOps UI now that the action is in place.
First, the action is visible in the workflow editor and available for selection:
## Adding a simple action
We have a block, we've implemented authentication, and now it's time to move on to the core of every integration: actions.
### Removing the default action
When you scaffold a block, OpenOps adds an action called **Custom API Call**. While we could tweak it to work for YouTrack, let's instead remove it and create a new action from scratch.
After removing the scaffolded action, the `src/index.ts` file looks like this:
```ts theme={null}
import { createBlock } from '@openops/blocks-framework';
import { BlockCategory } from '@openops/shared';
import { youtrackAuth } from './lib/auth';
export const youtrack = createBlock({
displayName: 'YouTrack',
auth: youtrackAuth,
minimumSupportedRelease: '0.20.0',
logoUrl:
'https://resources.jetbrains.com/storage/products/company/brand/logos/YouTrack_icon.png',
authors: [],
categories: [BlockCategory.COLLABORATION],
actions: [],
triggers: [],
});
```
The `actions` array is now empty. Once we create an action, we'll need to add a reference to it there.
### Scaffolding the new action
OpenOps provides scaffolding for actions as well, so let's run this in the terminal:
```bash theme={null}
npm run cli actions create
```
The CLI asks four questions to define the new action:
1. `Enter the block folder name`: the folder where the block for the new action resides. For the existing YouTrack block, the value should be `youtrack`.
2. `Enter the action display name`: a human-readable name for the action that users will see in the UI. It's also used to name the action's file. In this case, we want an action that lists issues in a YouTrack instance, so let's call it `Get all issues`.
3. `Enter the action description`: a brief, informative text shown in the UI to explain the action's function and purpose. Let's enter `Retrieves all issues from a YouTrack instance`.
4. `Does this action modify data or state (e.g., create, update, delete)?`: enter `n` for "No" as this is a read-only action.
With these values, the CLI scaffolds the action in a new file named `get-all-issues.ts` in the YouTrack block's `/src/lib/actions` directory. The file initially looks like this:
```ts theme={null}
import { createAction, Property } from '@openops/blocks-framework';
export const getAllIssues = createAction({
isWriteAction: false,
name: 'getAllIssues',
displayName: 'Get all issues',
description: 'Retrieves all issues from a YouTrack instance',
props: {},
async run() {
// Action logic here
},
});
```
As you can see, the scaffolding uses the `createAction()` helper function to define the action. The values of `displayName` and `description` are the same as the values provided in the CLI.
The `props` property is empty, which means there are no configuration options for the user to set. For this first action, that's fine; we'll add another action with configuration options later.
### Adding action execution logic
The scaffolded action has two prominent omissions:
1. It doesn't have an `auth` property referencing the block's authentication logic implemented earlier.
2. Its `run()` function, which should define the action logic, is empty.
Let's fix these two issues by replacing the scaffolded version with the following:
```ts theme={null}
import { httpClient, HttpMethod } from '@openops/blocks-common';
import { createAction } from '@openops/blocks-framework';
import { youtrackAuth, YouTrackAuth } from '../auth';
export const getAllIssues = createAction({
isWriteAction: false,
name: 'getAllIssues',
displayName: 'Get all issues',
description: 'Retrieves all issues from a YouTrack instance',
props: {},
auth: youtrackAuth,
async run(context) {
const endpoint =
'/api/issues?query=for:%20me%20%23Unresolved%20&fields=id,project(shortName),numberInProject,summary,description&$top=10';
const auth = context.auth as YouTrackAuth;
const requestUrl = `${auth.apiUrl}${endpoint}`;
const response = await httpClient.sendRequest({
method: HttpMethod.GET,
url: requestUrl,
headers: {
Authorization: `Bearer ${auth.apiKey}`,
Accept: 'application/json',
'Content-Type': 'application/json',
},
});
return {
_debug: {
request: {
method: 'GET',
requestUrl,
},
response: {
status: response.status,
},
},
issues: response.body,
};
},
});
```
Here's what's changed:
1. The action now has an `auth` property that references the block's authentication logic. Both the authentication logic and its interface are imported from the block's `auth.ts` file.
2. The `run()` function now makes a request to a YouTrack API endpoint to retrieve the first 10 unresolved issues.
3. To make the API call, the `run()` function uses the imported `httpClient` constant, which is an OpenOps-provided wrapper around the Axios HTTP client. Some blocks, such as [Linear](http://github.com/openops-cloud/openops/blob/main/packages/blocks/linear/src/lib/common/client.ts) and [Jira](https://github.com/openops-cloud/openops/blob/main/packages/blocks/jira-cloud/src/lib/common/index.ts), create separate functions for making HTTP requests to their APIs. This can be useful for providing extra error handling or leveraging existing SDKs, but for YouTrack, we can just use `httpClient` directly.
4. The `return` statement of the `run()` function defines what the user sees as the output of the action. The format of the returned object is up to the block author. In this case, we're returning an object with two properties: `_debug` and `issues`. The `_debug` property is a container for debugging information useful during development. The `issues` property is an array of issues retrieved from the YouTrack instance.
### Referencing the action from the block definition
Before testing the action, we need to add it to the block's definition. In the `src/index.ts` file, we need to import the action and add it to the `actions` array:
```ts theme={null}
import { createBlock } from '@openops/blocks-framework';
import { BlockCategory } from '@openops/shared';
import { getAllIssues } from './lib/actions/get-all-issues';
import { youtrackAuth } from './lib/auth';
export const youtrack = createBlock({
displayName: 'YouTrack',
auth: youtrackAuth,
minimumSupportedRelease: '0.20.0',
logoUrl:
'https://resources.jetbrains.com/storage/products/company/brand/logos/YouTrack_icon.png',
authors: [],
categories: [BlockCategory.COLLABORATION],
actions: [getAllIssues],
triggers: [],
});
```
### Testing the action
Let's see what happens in the OpenOps UI now that the action is in place.
First, the action is visible in the workflow editor and available for selection:
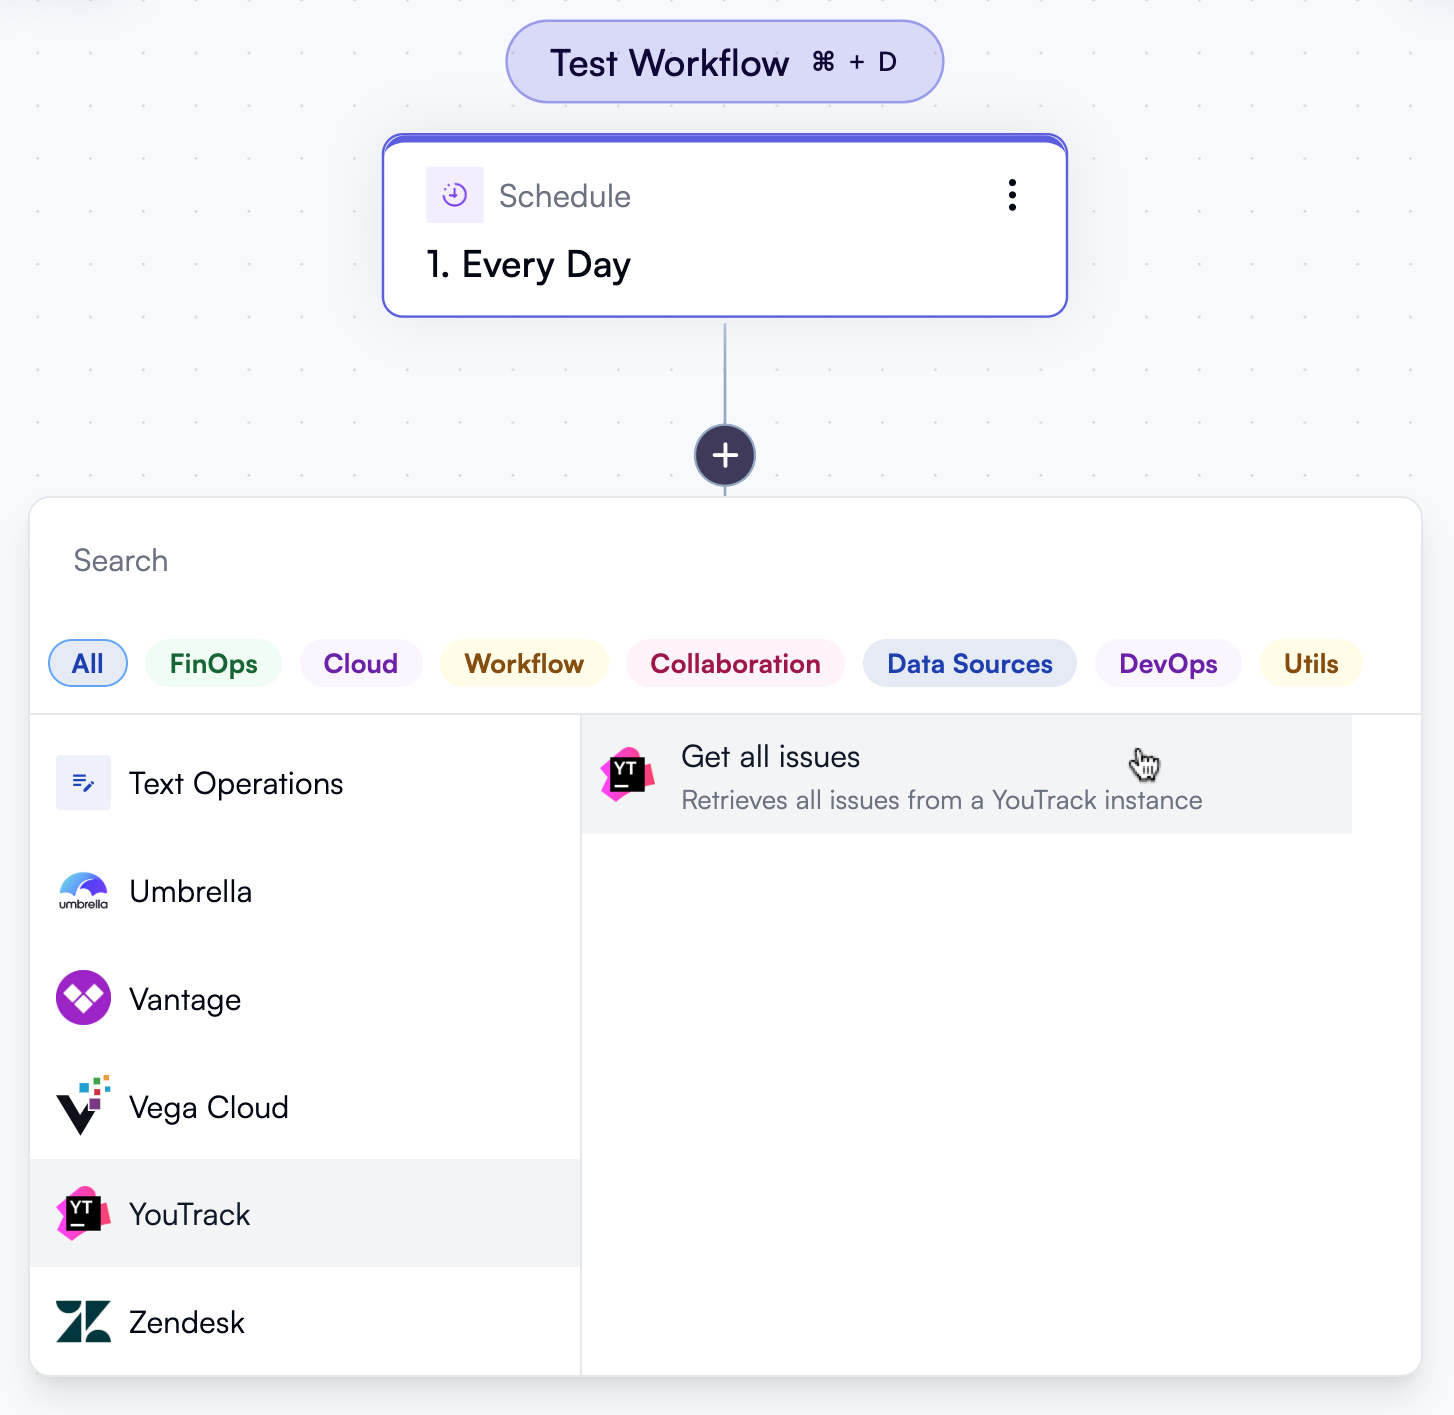 In the **Configure** tab of the action's properties pane, there's a connection selector, which is provided automatically because the action requires authentication. There are also two toggles, **Continue on Failure** and **Retry on Failure**, which are available for all actions. There are no properties specific to this action since we haven't defined any.
If we go to the **Test** tab and click **Test Step**, the action connects to the YouTrack instance configured in the connection and returns results in the format defined by the `return` statement in the action's `run()` function:
## Adding an action with properties
We've seen how to create a simple action that doesn't require any configuration. More often than not, real-world actions do require the user to enter or select values in the properties pane, and the values of these properties often depend on one another.
For a YouTrack integration, it makes sense to enable the user not only to get the list of issues but also to update specific issues. Let's add a new action that allows the user to change the status of an issue. This action will include several configurable properties, and one of these properties will depend on the value of another.
### Scaffolding the new action
First, let's use the OpenOps scaffolding to create a stub for the new action:
```bash theme={null}
npm run cli actions create
```
The values to provide to the CLI are as follows:
1. `Enter the block folder name`: as before, this should be `youtrack`.
2. `Enter the action display name`: let's call the new action `Change issue status`.
3. `Enter the action description`: let's describe the action as `Updates the status of a given issue`.
4. `Does this action modify data or state (e.g., create, update, delete)?`: it's `Y` for "Yes" as this action does update the state of an external system.
With these values, the CLI scaffolds the action in a new file named `change-issue-status.ts` in the YouTrack block's `/src/lib/actions` directory:
```ts theme={null}
import { createAction, Property } from '@openops/blocks-framework';
export const changeIssueStatus = createAction({
isWriteAction: false,
name: 'changeIssueStatus',
displayName: 'Change issue status',
description: 'Updates the status of a given issue',
props: {},
async run() {
// Action logic here
},
});
```
### Referencing the action from the block definition
This time, let's reference the new action in the block's definition (`src/index.ts`) before working on the action logic:
```ts theme={null}
import { createBlock } from '@openops/blocks-framework';
import { BlockCategory } from '@openops/shared';
import { changeIssueStatus } from './lib/actions/change-issue-status';
import { getAllIssues } from './lib/actions/get-all-issues';
import { youtrackAuth } from './lib/auth';
export const youtrack = createBlock({
displayName: 'YouTrack',
auth: youtrackAuth,
minimumSupportedRelease: '0.20.0',
logoUrl:
'https://resources.jetbrains.com/storage/products/company/brand/logos/YouTrack_icon.png',
authors: [],
categories: [BlockCategory.COLLABORATION],
actions: [getAllIssues, changeIssueStatus],
triggers: [],
});
```
### Adding authentication and imports
Back in the action file, let's start by referencing the authentication logic we defined earlier. While we're at it, let's also import the `YouTrackAuth` interface, along with the HTTP client that OpenOps provides:
```ts theme={null}
import { httpClient, HttpMethod } from '@openops/blocks-common';
import { createAction, Property } from '@openops/blocks-framework';
import { YouTrackAuth, youtrackAuth } from '../auth';
export const changeIssueStatus = createAction({
auth: youtrackAuth,
isWriteAction: false,
name: 'changeIssueStatus',
displayName: 'Change issue status',
description: 'Updates the status of a given issue',
props: {},
async run() {
// Action logic here
},
});
```
### Adding an interface representing a YouTrack project
Before adding properties, let's define an interface for the YouTrack project that the issue being updated belongs to. We'll use it both in the property that helps select a project and in another property that depends on it.
We could create the interface in a separate file, but placing it at the end of the `change-issue-status.ts` file works just as well:
```ts theme={null}
interface YouTrackProject {
id: string;
name: string;
shortName: string;
}
```
### Adding a dropdown property to select a project
We can now add the first property to the `props` parameter of `createAction()`. This property represents a dropdown that lets the user select a YouTrack project that the issue being updated belongs to:
```ts theme={null}
props: {
project: Property.Dropdown({
displayName: 'Project',
required: true,
refreshers: ['auth'],
options: async ({ auth }) => {
if (!auth) {
return {
options: [],
};
}
const requestAuth = auth as YouTrackAuth;
const projectsRequest = await httpClient.sendRequest({
method: HttpMethod.GET,
url: `${requestAuth.apiUrl}/api/admin/projects?fields=id,name,shortName`,
headers: {
Authorization: `Bearer ${requestAuth.apiKey}`,
Accept: 'application/json',
'Content-Type': 'application/json',
},
});
return {
options: projectsRequest.body.map((project: YouTrackProject) => {
return {
label: project.name,
value: project,
};
}),
};
},
}),
}
```
Here's what happens inside the `project` property:
* `displayName` is how the dropdown for this property is labeled in the UI.
* `required` marks this property as required. The action will not run unless the user selects a value.
* `refreshers` defines when the values of this property should be re-evaluated. The value `auth` in this array means that this property refreshes only when the connection used by this action changes.
* `options()` defines the logic for populating the values of this property. A quick check on the value of the `auth` property allows returning an empty set of values when no connection is defined.
* If a connection is defined, it's safe to make a request to the YouTrack API to retrieve the list of projects in the connected YouTrack instance.
* When the YouTrack API request succeeds, its response is transformed into an array of objects representing the projects. Each object has two properties: `label` and `value`. The `label` property is the text shown in dropdown items, representing the name of each YouTrack project. The `value` property contains additional information about the project retrieved from the API, including its ID and short name — these will be useful later when passed to another property.
* The array is assigned to the `options` property of a new object that serves as the return value of the `options()` function.
If we launch OpenOps, we can see that the new action is now available in the workflow editor:
In the **Configure** tab of the action's properties pane, there's a connection selector, which is provided automatically because the action requires authentication. There are also two toggles, **Continue on Failure** and **Retry on Failure**, which are available for all actions. There are no properties specific to this action since we haven't defined any.
If we go to the **Test** tab and click **Test Step**, the action connects to the YouTrack instance configured in the connection and returns results in the format defined by the `return` statement in the action's `run()` function:
## Adding an action with properties
We've seen how to create a simple action that doesn't require any configuration. More often than not, real-world actions do require the user to enter or select values in the properties pane, and the values of these properties often depend on one another.
For a YouTrack integration, it makes sense to enable the user not only to get the list of issues but also to update specific issues. Let's add a new action that allows the user to change the status of an issue. This action will include several configurable properties, and one of these properties will depend on the value of another.
### Scaffolding the new action
First, let's use the OpenOps scaffolding to create a stub for the new action:
```bash theme={null}
npm run cli actions create
```
The values to provide to the CLI are as follows:
1. `Enter the block folder name`: as before, this should be `youtrack`.
2. `Enter the action display name`: let's call the new action `Change issue status`.
3. `Enter the action description`: let's describe the action as `Updates the status of a given issue`.
4. `Does this action modify data or state (e.g., create, update, delete)?`: it's `Y` for "Yes" as this action does update the state of an external system.
With these values, the CLI scaffolds the action in a new file named `change-issue-status.ts` in the YouTrack block's `/src/lib/actions` directory:
```ts theme={null}
import { createAction, Property } from '@openops/blocks-framework';
export const changeIssueStatus = createAction({
isWriteAction: false,
name: 'changeIssueStatus',
displayName: 'Change issue status',
description: 'Updates the status of a given issue',
props: {},
async run() {
// Action logic here
},
});
```
### Referencing the action from the block definition
This time, let's reference the new action in the block's definition (`src/index.ts`) before working on the action logic:
```ts theme={null}
import { createBlock } from '@openops/blocks-framework';
import { BlockCategory } from '@openops/shared';
import { changeIssueStatus } from './lib/actions/change-issue-status';
import { getAllIssues } from './lib/actions/get-all-issues';
import { youtrackAuth } from './lib/auth';
export const youtrack = createBlock({
displayName: 'YouTrack',
auth: youtrackAuth,
minimumSupportedRelease: '0.20.0',
logoUrl:
'https://resources.jetbrains.com/storage/products/company/brand/logos/YouTrack_icon.png',
authors: [],
categories: [BlockCategory.COLLABORATION],
actions: [getAllIssues, changeIssueStatus],
triggers: [],
});
```
### Adding authentication and imports
Back in the action file, let's start by referencing the authentication logic we defined earlier. While we're at it, let's also import the `YouTrackAuth` interface, along with the HTTP client that OpenOps provides:
```ts theme={null}
import { httpClient, HttpMethod } from '@openops/blocks-common';
import { createAction, Property } from '@openops/blocks-framework';
import { YouTrackAuth, youtrackAuth } from '../auth';
export const changeIssueStatus = createAction({
auth: youtrackAuth,
isWriteAction: false,
name: 'changeIssueStatus',
displayName: 'Change issue status',
description: 'Updates the status of a given issue',
props: {},
async run() {
// Action logic here
},
});
```
### Adding an interface representing a YouTrack project
Before adding properties, let's define an interface for the YouTrack project that the issue being updated belongs to. We'll use it both in the property that helps select a project and in another property that depends on it.
We could create the interface in a separate file, but placing it at the end of the `change-issue-status.ts` file works just as well:
```ts theme={null}
interface YouTrackProject {
id: string;
name: string;
shortName: string;
}
```
### Adding a dropdown property to select a project
We can now add the first property to the `props` parameter of `createAction()`. This property represents a dropdown that lets the user select a YouTrack project that the issue being updated belongs to:
```ts theme={null}
props: {
project: Property.Dropdown({
displayName: 'Project',
required: true,
refreshers: ['auth'],
options: async ({ auth }) => {
if (!auth) {
return {
options: [],
};
}
const requestAuth = auth as YouTrackAuth;
const projectsRequest = await httpClient.sendRequest({
method: HttpMethod.GET,
url: `${requestAuth.apiUrl}/api/admin/projects?fields=id,name,shortName`,
headers: {
Authorization: `Bearer ${requestAuth.apiKey}`,
Accept: 'application/json',
'Content-Type': 'application/json',
},
});
return {
options: projectsRequest.body.map((project: YouTrackProject) => {
return {
label: project.name,
value: project,
};
}),
};
},
}),
}
```
Here's what happens inside the `project` property:
* `displayName` is how the dropdown for this property is labeled in the UI.
* `required` marks this property as required. The action will not run unless the user selects a value.
* `refreshers` defines when the values of this property should be re-evaluated. The value `auth` in this array means that this property refreshes only when the connection used by this action changes.
* `options()` defines the logic for populating the values of this property. A quick check on the value of the `auth` property allows returning an empty set of values when no connection is defined.
* If a connection is defined, it's safe to make a request to the YouTrack API to retrieve the list of projects in the connected YouTrack instance.
* When the YouTrack API request succeeds, its response is transformed into an array of objects representing the projects. Each object has two properties: `label` and `value`. The `label` property is the text shown in dropdown items, representing the name of each YouTrack project. The `value` property contains additional information about the project retrieved from the API, including its ID and short name — these will be useful later when passed to another property.
* The array is assigned to the `options` property of a new object that serves as the return value of the `options()` function.
If we launch OpenOps, we can see that the new action is now available in the workflow editor:
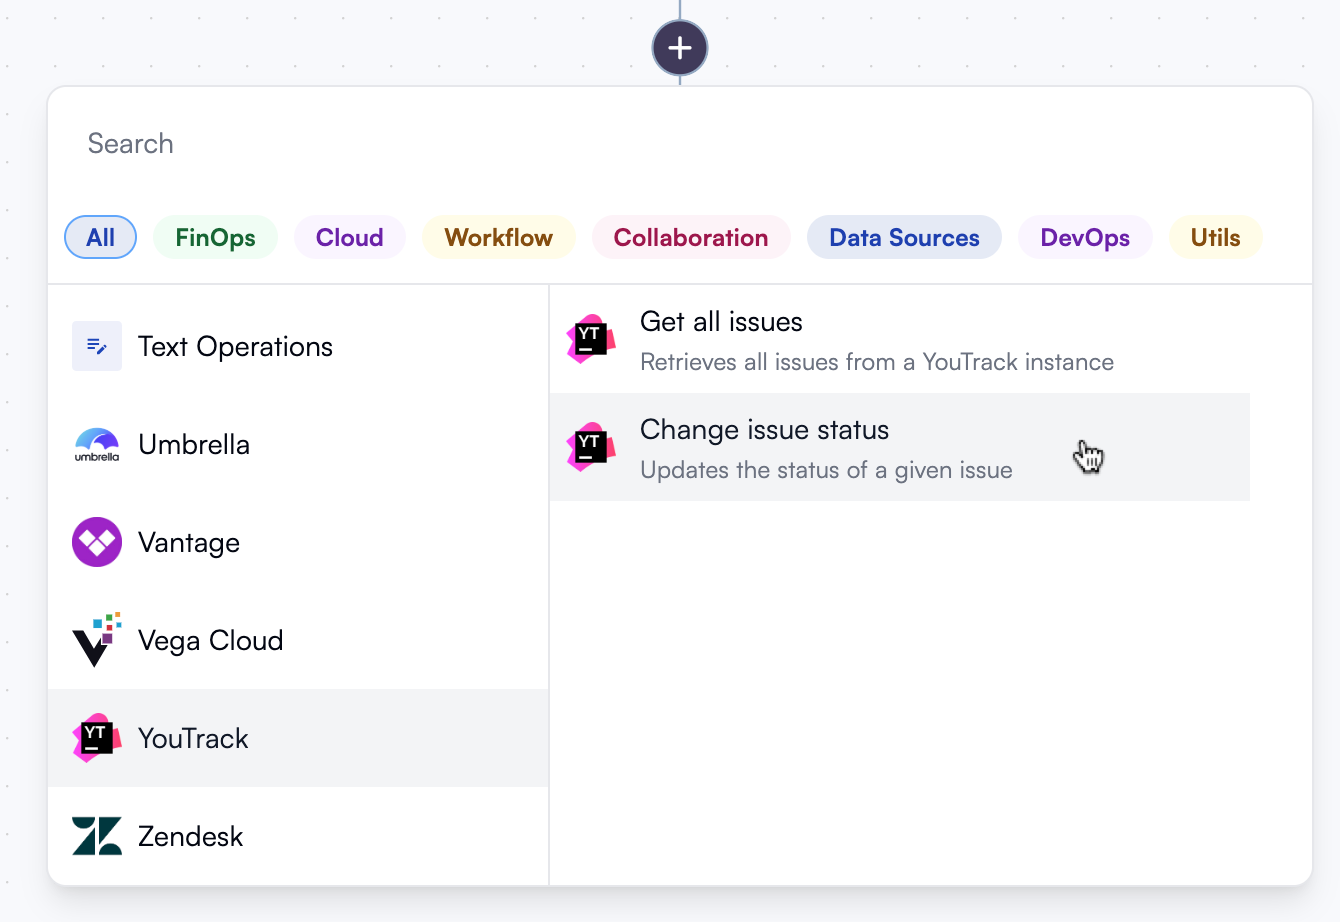 If we add the action and open the properties pane, we can see the **Project** dropdown listing the projects available in the connected YouTrack instance:
### Adding an input property for an issue ID
The next property we'll add to `props` is an input field that lets the user enter the numeric part of the ID of the issue to update. This type of property is simple, declarative, and doesn't contain any custom logic:
```ts theme={null}
props: {
...
issueId: Property.Number({
displayName: 'Number from issue ID',
description: 'If issue ID is PRJ-47, enter 47 in this field',
required: true,
}),
}
```
In the OpenOps UI, the user can either enter the value manually or use **Data Selector** to select a value from a previous step:
### Adding a dropdown property for the new status
The final property we'll add to `props` is another dropdown that lets the user select the new status for the issue. This property shows different values depending on what's selected in the **Project** dropdown.
```ts theme={null}
props: {
...
newStatus: Property.Dropdown({
displayName: 'New Status',
refreshers: ['project'],
required: true,
options: async ({
auth,
project,
}: {
auth?: YouTrackAuth;
project?: YouTrackProject;
}) => {
if (!auth || !project) {
return {
disabled: true,
options: [],
placeholder: 'Please authenticate and specify a project',
};
}
const projectCustomFieldsResponse = await httpClient.sendRequest({
method: HttpMethod.GET,
url: `${auth.apiUrl}/api/admin/projects/${project.id}/customFields?fields=id,field(id,name,fieldType),bundle(id)`,
headers: {
Authorization: `Bearer ${auth.apiKey}`,
Accept: 'application/json',
'Content-Type': 'application/json',
},
});
const statusBundle = projectCustomFieldsResponse.body.find(
(item: { bundle?: { $type?: string } }) =>
item.bundle?.$type === 'StateBundle',
);
if (!statusBundle) {
return {
disabled: true,
options: [],
placeholder: "The selected project doesn't have a Status field.",
};
}
const statusBundleId = statusBundle.bundle.id;
const statusValuesResponse = await httpClient.sendRequest({
method: HttpMethod.GET,
url: `${auth.apiUrl}/api/admin/customFieldSettings/bundles/enum/${statusBundleId}/values?fields=id,name`,
headers: {
Authorization: `Bearer ${auth.apiKey}`,
Accept: 'application/json',
'Content-Type': 'application/json',
},
});
return {
disabled: false,
options: statusValuesResponse.body.map(
(statusValue: { name: string; id: string }) => {
return {
label: statusValue.name,
value: {
newStatusValue: statusValue,
bundle: statusBundle,
},
};
},
),
};
},
})
}
```
It's quite a lot of code, but most of it deals with the specifics of the YouTrack API. Let's break down what's happening here:
* The `refreshers` array contains `project`, meaning this dropdown refreshes every time a new value is selected in the **Project** dropdown. This is exactly what we want because different projects have different status values.
* The `options()` function receives two parameters: `auth`, which represents the block authentication, and `project`, which holds the object representing the selected project. Remember the `value` property we returned from the `options()` of the `project` property? That's what the `project` parameter contains here.
* If either parameter is undefined — meaning a connection isn't configured or a project isn't selected — the dropdown is disabled.
* Two calls are made to YouTrack API endpoints to retrieve the list of status values in the selected project. The first call uses the `project` parameter, which reflects the selected value of the **Project** dropdown. If the project doesn't have a Status field, the dropdown is disabled and a placeholder is shown.
* Once the list of status values is obtained, it's returned as an array in the `options` property representing the dropdown items. The `label` is the name of each status shown in the dropdown, and `value` contains additional data that will be used later when the action is executed.
Looking at the OpenOps UI now, we can see that the **New Status** dropdown is available and lists status values for the selected project:
If we select another project with a different set of status values, the dropdown updates accordingly:
### Adding action execution logic
The last step is to add the logic executed when the action runs. This logic makes a request to the YouTrack API to update the issue's status, using the inputs provided by the user in the properties we added above.
```ts theme={null}
async run(context) {
const { project, issueId, newStatus } = context.propsValue;
const { auth } = context;
const issueExistsResponse = await httpClient.sendRequest({
method: HttpMethod.GET,
url: `${auth.apiUrl}/api/issues/${project.shortName}-${issueId}?fields=id,summary,description,customFields(id,name,value(id,name))`,
headers: {
Authorization: `Bearer ${auth.apiKey}`,
Accept: 'application/json',
'Content-Type': 'application/json',
},
});
const issueDbId = issueExistsResponse.body?.id;
if (!issueDbId) {
throw new Error(
'The issue does not exist. Please fix inputs to specify an existing issue',
);
} else {
const issueCustomField = issueExistsResponse.body?.customFields?.find(
(x: { id: string; $type: string }) => x.id === newStatus.bundle.id,
);
const updateIssueStatusResponse = await httpClient.sendRequest({
method: HttpMethod.POST,
url: `${auth.apiUrl}/api/issues/${issueDbId}?fields=id,numberInProject,project,summary,description,customFields(id,name,value(id,name))`,
headers: {
Authorization: `Bearer ${auth.apiKey}`,
Accept: 'application/json',
'Content-Type': 'application/json',
},
body: {
customFields: [
{
value: newStatus.newStatusValue,
id: issueCustomField.id,
$type: issueCustomField.$type,
},
],
},
});
return updateIssueStatusResponse.body;
}
}
```
Here's what's happening in this function:
* The `run()` function receives the `context` object, which contains extensive data about the current action and the workflow's execution state, including the block authentication (`context.auth`) and the values of all the action's properties (`context.propsValue`).
* The first call to the YouTrack API checks that the specified issue exists. In that call, we're using the values from both the **Project** dropdown and the **Number from issue ID** input field.
* If the issue exists, we look for the part of its data that represents the status field. Once found, another YouTrack API call updates the status to the value specified in the **New Status** dropdown.
* The updated issue data is returned from the `run()` function, and this is what the user sees as the output of the executed action.
If we go to the workflow editor now and test the action, here's the kind of output we should see:
In this case, we're simply returning the body of the response from the YouTrack API, but you could return an object with a different shape. That's entirely up to you.
This wraps up the **Change issue status** action. Since it uses several dynamic properties and the YouTrack API isn't always succinct, the code for the action is fairly long. Here's the full listing of the resulting `change-issue-status.ts` file:
```ts theme={null}
import { httpClient, HttpMethod } from '@openops/blocks-common';
import { createAction, Property } from '@openops/blocks-framework';
import { YouTrackAuth, youtrackAuth } from '../auth';
export const changeIssueStatus = createAction({
auth: youtrackAuth,
isWriteAction: false,
name: 'changeIssueStatus',
displayName: 'Change issue status',
description: 'Updates the status of a given issue',
props: {
project: Property.Dropdown({
displayName: 'Project',
required: true,
refreshers: ['auth'],
options: async ({ auth }) => {
if (!auth) {
return {
options: [],
};
}
const requestAuth = auth as YouTrackAuth;
const projectsRequest = await httpClient.sendRequest({
method: HttpMethod.GET,
url: `${requestAuth.apiUrl}/api/admin/projects?fields=id,name,shortName`,
headers: {
Authorization: `Bearer ${requestAuth.apiKey}`,
Accept: 'application/json',
'Content-Type': 'application/json',
},
});
return {
options: projectsRequest.body.map((project: YouTrackProject) => {
return {
label: project.name,
value: project,
};
}),
};
},
}),
issueId: Property.Number({
displayName: 'Number from issue ID',
description: 'If issue ID is PRJ-47, enter 47 in this field',
required: true,
}),
newStatus: Property.Dropdown({
displayName: 'New Status',
refreshers: ['project'],
required: true,
options: async ({
auth,
project,
}: {
auth?: YouTrackAuth;
project?: YouTrackProject;
}) => {
if (!auth || !project) {
return {
disabled: true,
options: [],
placeholder: 'Please authenticate and specify a project',
};
}
const projectCustomFieldsResponse = await httpClient.sendRequest({
method: HttpMethod.GET,
url: `${auth.apiUrl}/api/admin/projects/${project.id}/customFields?fields=id,field(id,name,fieldType),bundle(id)`,
headers: {
Authorization: `Bearer ${auth.apiKey}`,
Accept: 'application/json',
'Content-Type': 'application/json',
},
});
const statusBundle = projectCustomFieldsResponse.body.find(
(item: { bundle?: { $type?: string } }) =>
item.bundle?.$type === 'StateBundle',
);
if (!statusBundle) {
return {
disabled: true,
options: [],
placeholder: "The selected project doesn't have a Status field.",
};
}
const statusBundleId = statusBundle.bundle.id;
const statusValuesResponse = await httpClient.sendRequest({
method: HttpMethod.GET,
url: `${auth.apiUrl}/api/admin/customFieldSettings/bundles/enum/${statusBundleId}/values?fields=id,name`,
headers: {
Authorization: `Bearer ${auth.apiKey}`,
Accept: 'application/json',
'Content-Type': 'application/json',
},
});
return {
disabled: false,
options: statusValuesResponse.body.map(
(statusValue: { name: string; id: string }) => {
return {
label: statusValue.name,
value: {
newStatusValue: statusValue,
bundle: statusBundle,
},
};
},
),
};
},
}),
},
async run(context) {
const { project, issueId, newStatus } = context.propsValue;
const { auth } = context;
const issueExistsResponse = await httpClient.sendRequest({
method: HttpMethod.GET,
url: `${auth.apiUrl}/api/issues/${project.shortName}-${issueId}?fields=id,summary,description,customFields(id,name,value(id,name))`,
headers: {
Authorization: `Bearer ${auth.apiKey}`,
Accept: 'application/json',
'Content-Type': 'application/json',
},
});
const issueDbId = issueExistsResponse.body?.id;
if (!issueDbId) {
throw new Error(
'The issue does not exist. Please fix inputs to specify an existing issue',
);
} else {
const issueCustomField = issueExistsResponse.body?.customFields?.find(
(x: { id: string; $type: string }) => x.id === newStatus.bundle.id,
);
const updateIssueStatusResponse = await httpClient.sendRequest({
method: HttpMethod.POST,
url: `${auth.apiUrl}/api/issues/${issueDbId}?fields=id,numberInProject,project,summary,description,customFields(id,name,value(id,name))`,
headers: {
Authorization: `Bearer ${auth.apiKey}`,
Accept: 'application/json',
'Content-Type': 'application/json',
},
body: {
customFields: [
{
value: newStatus.newStatusValue,
id: issueCustomField.id,
$type: issueCustomField.$type,
},
],
},
});
return updateIssueStatusResponse.body;
}
},
});
interface YouTrackProject {
id: string;
name: string;
shortName: string;
}
```
## Summary
This guide walked you through creating a fully functional third-party integration for OpenOps by building a JetBrains YouTrack block with two actions. Along the way, you learned techniques involved in developing OpenOps blocks, including:
* Implementing custom authentication that requires specifying an API key and a base URL. To learn more about authentication types that OpenOps supports, see [Authentication](/contributing/authentication/).
* Adding configuration properties to actions, including dynamic, interdependent properties.
* Using values returned by properties in other properties, as well as in the action's execution logic.
To dive deeper into the internals of OpenOps blocks, explore the [code of existing blocks](https://github.com/openops-cloud/openops/tree/main/packages/blocks) or review past pull requests that added new blocks, such as [Ternary](https://github.com/openops-cloud/openops/pull/326), [ServiceNow](https://github.com/openops-cloud/openops/pull/1078), and [nOps.io](https://github.com/openops-cloud/openops/pull/1403).
If we add the action and open the properties pane, we can see the **Project** dropdown listing the projects available in the connected YouTrack instance:
### Adding an input property for an issue ID
The next property we'll add to `props` is an input field that lets the user enter the numeric part of the ID of the issue to update. This type of property is simple, declarative, and doesn't contain any custom logic:
```ts theme={null}
props: {
...
issueId: Property.Number({
displayName: 'Number from issue ID',
description: 'If issue ID is PRJ-47, enter 47 in this field',
required: true,
}),
}
```
In the OpenOps UI, the user can either enter the value manually or use **Data Selector** to select a value from a previous step:
### Adding a dropdown property for the new status
The final property we'll add to `props` is another dropdown that lets the user select the new status for the issue. This property shows different values depending on what's selected in the **Project** dropdown.
```ts theme={null}
props: {
...
newStatus: Property.Dropdown({
displayName: 'New Status',
refreshers: ['project'],
required: true,
options: async ({
auth,
project,
}: {
auth?: YouTrackAuth;
project?: YouTrackProject;
}) => {
if (!auth || !project) {
return {
disabled: true,
options: [],
placeholder: 'Please authenticate and specify a project',
};
}
const projectCustomFieldsResponse = await httpClient.sendRequest({
method: HttpMethod.GET,
url: `${auth.apiUrl}/api/admin/projects/${project.id}/customFields?fields=id,field(id,name,fieldType),bundle(id)`,
headers: {
Authorization: `Bearer ${auth.apiKey}`,
Accept: 'application/json',
'Content-Type': 'application/json',
},
});
const statusBundle = projectCustomFieldsResponse.body.find(
(item: { bundle?: { $type?: string } }) =>
item.bundle?.$type === 'StateBundle',
);
if (!statusBundle) {
return {
disabled: true,
options: [],
placeholder: "The selected project doesn't have a Status field.",
};
}
const statusBundleId = statusBundle.bundle.id;
const statusValuesResponse = await httpClient.sendRequest({
method: HttpMethod.GET,
url: `${auth.apiUrl}/api/admin/customFieldSettings/bundles/enum/${statusBundleId}/values?fields=id,name`,
headers: {
Authorization: `Bearer ${auth.apiKey}`,
Accept: 'application/json',
'Content-Type': 'application/json',
},
});
return {
disabled: false,
options: statusValuesResponse.body.map(
(statusValue: { name: string; id: string }) => {
return {
label: statusValue.name,
value: {
newStatusValue: statusValue,
bundle: statusBundle,
},
};
},
),
};
},
})
}
```
It's quite a lot of code, but most of it deals with the specifics of the YouTrack API. Let's break down what's happening here:
* The `refreshers` array contains `project`, meaning this dropdown refreshes every time a new value is selected in the **Project** dropdown. This is exactly what we want because different projects have different status values.
* The `options()` function receives two parameters: `auth`, which represents the block authentication, and `project`, which holds the object representing the selected project. Remember the `value` property we returned from the `options()` of the `project` property? That's what the `project` parameter contains here.
* If either parameter is undefined — meaning a connection isn't configured or a project isn't selected — the dropdown is disabled.
* Two calls are made to YouTrack API endpoints to retrieve the list of status values in the selected project. The first call uses the `project` parameter, which reflects the selected value of the **Project** dropdown. If the project doesn't have a Status field, the dropdown is disabled and a placeholder is shown.
* Once the list of status values is obtained, it's returned as an array in the `options` property representing the dropdown items. The `label` is the name of each status shown in the dropdown, and `value` contains additional data that will be used later when the action is executed.
Looking at the OpenOps UI now, we can see that the **New Status** dropdown is available and lists status values for the selected project:
If we select another project with a different set of status values, the dropdown updates accordingly:
### Adding action execution logic
The last step is to add the logic executed when the action runs. This logic makes a request to the YouTrack API to update the issue's status, using the inputs provided by the user in the properties we added above.
```ts theme={null}
async run(context) {
const { project, issueId, newStatus } = context.propsValue;
const { auth } = context;
const issueExistsResponse = await httpClient.sendRequest({
method: HttpMethod.GET,
url: `${auth.apiUrl}/api/issues/${project.shortName}-${issueId}?fields=id,summary,description,customFields(id,name,value(id,name))`,
headers: {
Authorization: `Bearer ${auth.apiKey}`,
Accept: 'application/json',
'Content-Type': 'application/json',
},
});
const issueDbId = issueExistsResponse.body?.id;
if (!issueDbId) {
throw new Error(
'The issue does not exist. Please fix inputs to specify an existing issue',
);
} else {
const issueCustomField = issueExistsResponse.body?.customFields?.find(
(x: { id: string; $type: string }) => x.id === newStatus.bundle.id,
);
const updateIssueStatusResponse = await httpClient.sendRequest({
method: HttpMethod.POST,
url: `${auth.apiUrl}/api/issues/${issueDbId}?fields=id,numberInProject,project,summary,description,customFields(id,name,value(id,name))`,
headers: {
Authorization: `Bearer ${auth.apiKey}`,
Accept: 'application/json',
'Content-Type': 'application/json',
},
body: {
customFields: [
{
value: newStatus.newStatusValue,
id: issueCustomField.id,
$type: issueCustomField.$type,
},
],
},
});
return updateIssueStatusResponse.body;
}
}
```
Here's what's happening in this function:
* The `run()` function receives the `context` object, which contains extensive data about the current action and the workflow's execution state, including the block authentication (`context.auth`) and the values of all the action's properties (`context.propsValue`).
* The first call to the YouTrack API checks that the specified issue exists. In that call, we're using the values from both the **Project** dropdown and the **Number from issue ID** input field.
* If the issue exists, we look for the part of its data that represents the status field. Once found, another YouTrack API call updates the status to the value specified in the **New Status** dropdown.
* The updated issue data is returned from the `run()` function, and this is what the user sees as the output of the executed action.
If we go to the workflow editor now and test the action, here's the kind of output we should see:
In this case, we're simply returning the body of the response from the YouTrack API, but you could return an object with a different shape. That's entirely up to you.
This wraps up the **Change issue status** action. Since it uses several dynamic properties and the YouTrack API isn't always succinct, the code for the action is fairly long. Here's the full listing of the resulting `change-issue-status.ts` file:
```ts theme={null}
import { httpClient, HttpMethod } from '@openops/blocks-common';
import { createAction, Property } from '@openops/blocks-framework';
import { YouTrackAuth, youtrackAuth } from '../auth';
export const changeIssueStatus = createAction({
auth: youtrackAuth,
isWriteAction: false,
name: 'changeIssueStatus',
displayName: 'Change issue status',
description: 'Updates the status of a given issue',
props: {
project: Property.Dropdown({
displayName: 'Project',
required: true,
refreshers: ['auth'],
options: async ({ auth }) => {
if (!auth) {
return {
options: [],
};
}
const requestAuth = auth as YouTrackAuth;
const projectsRequest = await httpClient.sendRequest({
method: HttpMethod.GET,
url: `${requestAuth.apiUrl}/api/admin/projects?fields=id,name,shortName`,
headers: {
Authorization: `Bearer ${requestAuth.apiKey}`,
Accept: 'application/json',
'Content-Type': 'application/json',
},
});
return {
options: projectsRequest.body.map((project: YouTrackProject) => {
return {
label: project.name,
value: project,
};
}),
};
},
}),
issueId: Property.Number({
displayName: 'Number from issue ID',
description: 'If issue ID is PRJ-47, enter 47 in this field',
required: true,
}),
newStatus: Property.Dropdown({
displayName: 'New Status',
refreshers: ['project'],
required: true,
options: async ({
auth,
project,
}: {
auth?: YouTrackAuth;
project?: YouTrackProject;
}) => {
if (!auth || !project) {
return {
disabled: true,
options: [],
placeholder: 'Please authenticate and specify a project',
};
}
const projectCustomFieldsResponse = await httpClient.sendRequest({
method: HttpMethod.GET,
url: `${auth.apiUrl}/api/admin/projects/${project.id}/customFields?fields=id,field(id,name,fieldType),bundle(id)`,
headers: {
Authorization: `Bearer ${auth.apiKey}`,
Accept: 'application/json',
'Content-Type': 'application/json',
},
});
const statusBundle = projectCustomFieldsResponse.body.find(
(item: { bundle?: { $type?: string } }) =>
item.bundle?.$type === 'StateBundle',
);
if (!statusBundle) {
return {
disabled: true,
options: [],
placeholder: "The selected project doesn't have a Status field.",
};
}
const statusBundleId = statusBundle.bundle.id;
const statusValuesResponse = await httpClient.sendRequest({
method: HttpMethod.GET,
url: `${auth.apiUrl}/api/admin/customFieldSettings/bundles/enum/${statusBundleId}/values?fields=id,name`,
headers: {
Authorization: `Bearer ${auth.apiKey}`,
Accept: 'application/json',
'Content-Type': 'application/json',
},
});
return {
disabled: false,
options: statusValuesResponse.body.map(
(statusValue: { name: string; id: string }) => {
return {
label: statusValue.name,
value: {
newStatusValue: statusValue,
bundle: statusBundle,
},
};
},
),
};
},
}),
},
async run(context) {
const { project, issueId, newStatus } = context.propsValue;
const { auth } = context;
const issueExistsResponse = await httpClient.sendRequest({
method: HttpMethod.GET,
url: `${auth.apiUrl}/api/issues/${project.shortName}-${issueId}?fields=id,summary,description,customFields(id,name,value(id,name))`,
headers: {
Authorization: `Bearer ${auth.apiKey}`,
Accept: 'application/json',
'Content-Type': 'application/json',
},
});
const issueDbId = issueExistsResponse.body?.id;
if (!issueDbId) {
throw new Error(
'The issue does not exist. Please fix inputs to specify an existing issue',
);
} else {
const issueCustomField = issueExistsResponse.body?.customFields?.find(
(x: { id: string; $type: string }) => x.id === newStatus.bundle.id,
);
const updateIssueStatusResponse = await httpClient.sendRequest({
method: HttpMethod.POST,
url: `${auth.apiUrl}/api/issues/${issueDbId}?fields=id,numberInProject,project,summary,description,customFields(id,name,value(id,name))`,
headers: {
Authorization: `Bearer ${auth.apiKey}`,
Accept: 'application/json',
'Content-Type': 'application/json',
},
body: {
customFields: [
{
value: newStatus.newStatusValue,
id: issueCustomField.id,
$type: issueCustomField.$type,
},
],
},
});
return updateIssueStatusResponse.body;
}
},
});
interface YouTrackProject {
id: string;
name: string;
shortName: string;
}
```
## Summary
This guide walked you through creating a fully functional third-party integration for OpenOps by building a JetBrains YouTrack block with two actions. Along the way, you learned techniques involved in developing OpenOps blocks, including:
* Implementing custom authentication that requires specifying an API key and a base URL. To learn more about authentication types that OpenOps supports, see [Authentication](/contributing/authentication/).
* Adding configuration properties to actions, including dynamic, interdependent properties.
* Using values returned by properties in other properties, as well as in the action's execution logic.
To dive deeper into the internals of OpenOps blocks, explore the [code of existing blocks](https://github.com/openops-cloud/openops/tree/main/packages/blocks) or review past pull requests that added new blocks, such as [Ternary](https://github.com/openops-cloud/openops/pull/326), [ServiceNow](https://github.com/openops-cloud/openops/pull/1078), and [nOps.io](https://github.com/openops-cloud/openops/pull/1403).