> ## Documentation Index
> Fetch the complete documentation index at: https://openops-ecb4f397-mintlify-add-install-command-explanation-5.mintlify.site/llms.txt
> Use this file to discover all available pages before exploring further.
# AWS EC2 Deployment
> How to deploy OpenOps on an AWS EC2 instance
export const target_1 = "EC2 instance"
export const NarrowImage = ({src, alt, widthPercent}) => {
const className = `narrow-image-${useId().replace(/:/g, '-')}`;
const widthRule = widthPercent ? `width: ${widthPercent}%;` : '';
return <>
 ;
};
export const target_0 = "EC2 instance"
This guide is for testing and evaluation purposes only and is not intended for production deployments. Please reach out to us at [support@openops.com](mailto:support@openops.com) if you'd like to learn how to set up OpenOps in a production environment.
This guide explains how to install the OpenOps Docker Compose release on a newly created EC2 instance.
It assumes you have appropriate permissions on an existing AWS account.
## Initial deployment
### Create a new EC2 instance
1. On the EC2 home page, click **Launch Instance**:
2. Choose a name for your instance and configure the following settings:
* **Application and OS Images (Amazon Machine Image)**
* Choose **Ubuntu** as the instance image, as it simplifies Docker installation. Ubuntu Server 24.04 LTS was the latest available version when this guide was written.
* Keep **64-bit (x86)** as the instance architecture.
* **Instance type**. The *t3.large* instance type provides decent performance. You can choose a different type according to your needs, but it's not recommended to select a size smaller than *t3.medium*.
* **Key pair (login)**. Creating a new SSH key pair is recommended but not mandatory.
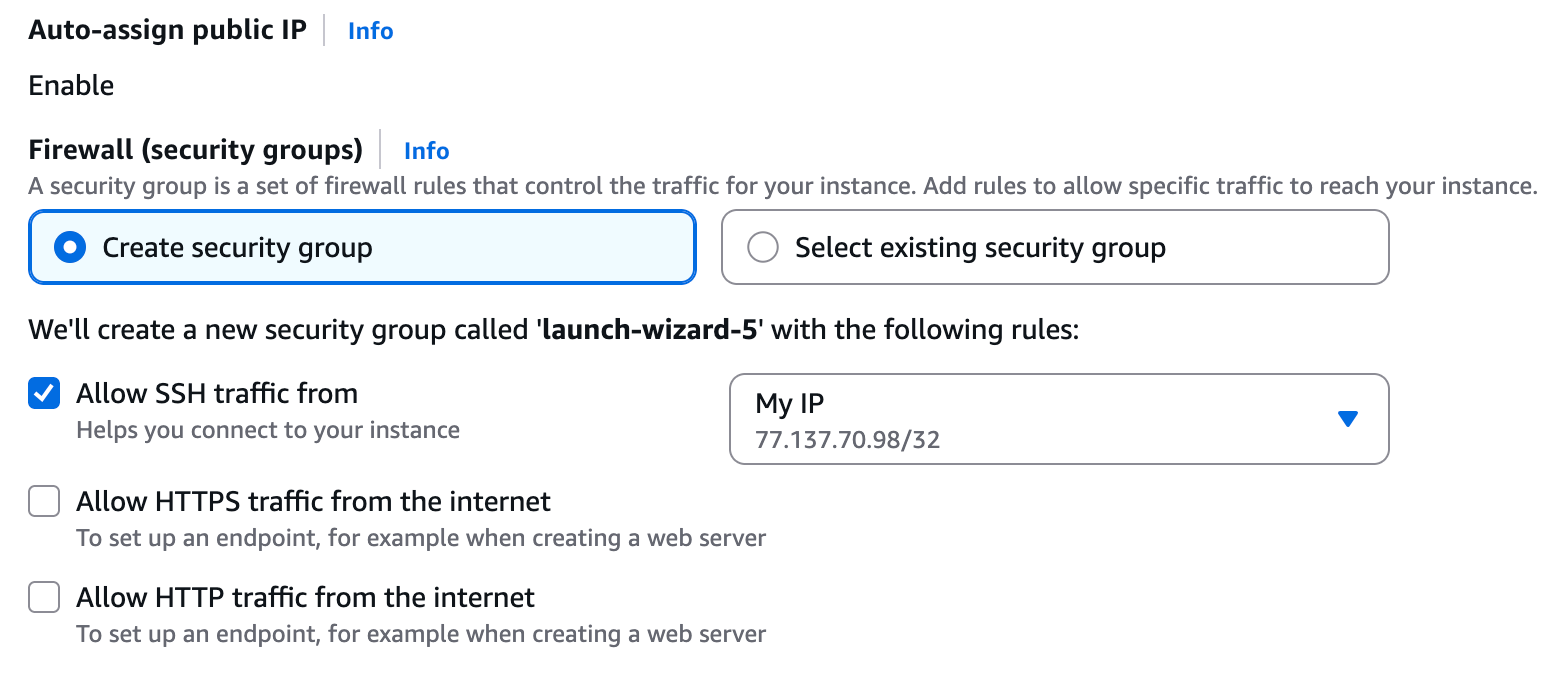
* **Network settings**. Allow SSH traffic from your own IP address:
;
};
export const target_0 = "EC2 instance"
This guide is for testing and evaluation purposes only and is not intended for production deployments. Please reach out to us at [support@openops.com](mailto:support@openops.com) if you'd like to learn how to set up OpenOps in a production environment.
This guide explains how to install the OpenOps Docker Compose release on a newly created EC2 instance.
It assumes you have appropriate permissions on an existing AWS account.
## Initial deployment
### Create a new EC2 instance
1. On the EC2 home page, click **Launch Instance**:
2. Choose a name for your instance and configure the following settings:
* **Application and OS Images (Amazon Machine Image)**
* Choose **Ubuntu** as the instance image, as it simplifies Docker installation. Ubuntu Server 24.04 LTS was the latest available version when this guide was written.
* Keep **64-bit (x86)** as the instance architecture.
* **Instance type**. The *t3.large* instance type provides decent performance. You can choose a different type according to your needs, but it's not recommended to select a size smaller than *t3.medium*.
* **Key pair (login)**. Creating a new SSH key pair is recommended but not mandatory.
* **Network settings**. Allow SSH traffic from your own IP address:
 * **Configure storage**. Choose **50GB** to ensure you have enough space for Docker images and databases.
3. In the **Summary** section on the right, click **Launch instance**:
4. Once the instance is launched, navigate to instance details by clicking the instance ID:
* **Configure storage**. Choose **50GB** to ensure you have enough space for Docker images and databases.
3. In the **Summary** section on the right, click **Launch instance**:
4. Once the instance is launched, navigate to instance details by clicking the instance ID:
 5. Configure the network settings and open the necessary ports:
1. Open the **Security** tab, then click on the security group.
5. Configure the network settings and open the necessary ports:
1. Open the **Security** tab, then click on the security group.
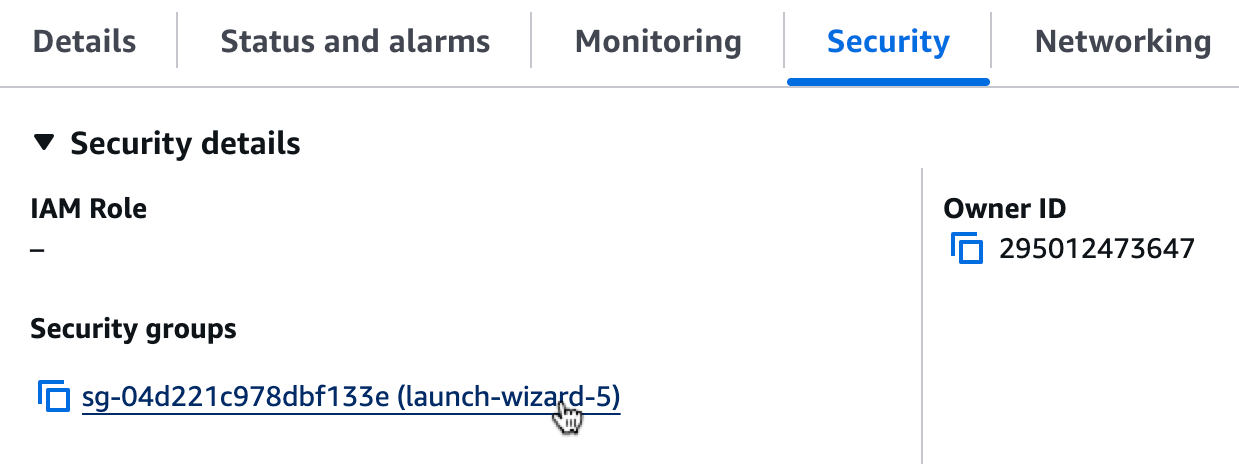 2. Click **Edit inbound rules**.
3. Add two new rules by clicking **Add rule** each time:
1. In the first rule, for **Type**, choose **HTTP**, and under **Source**, select **My IP**.
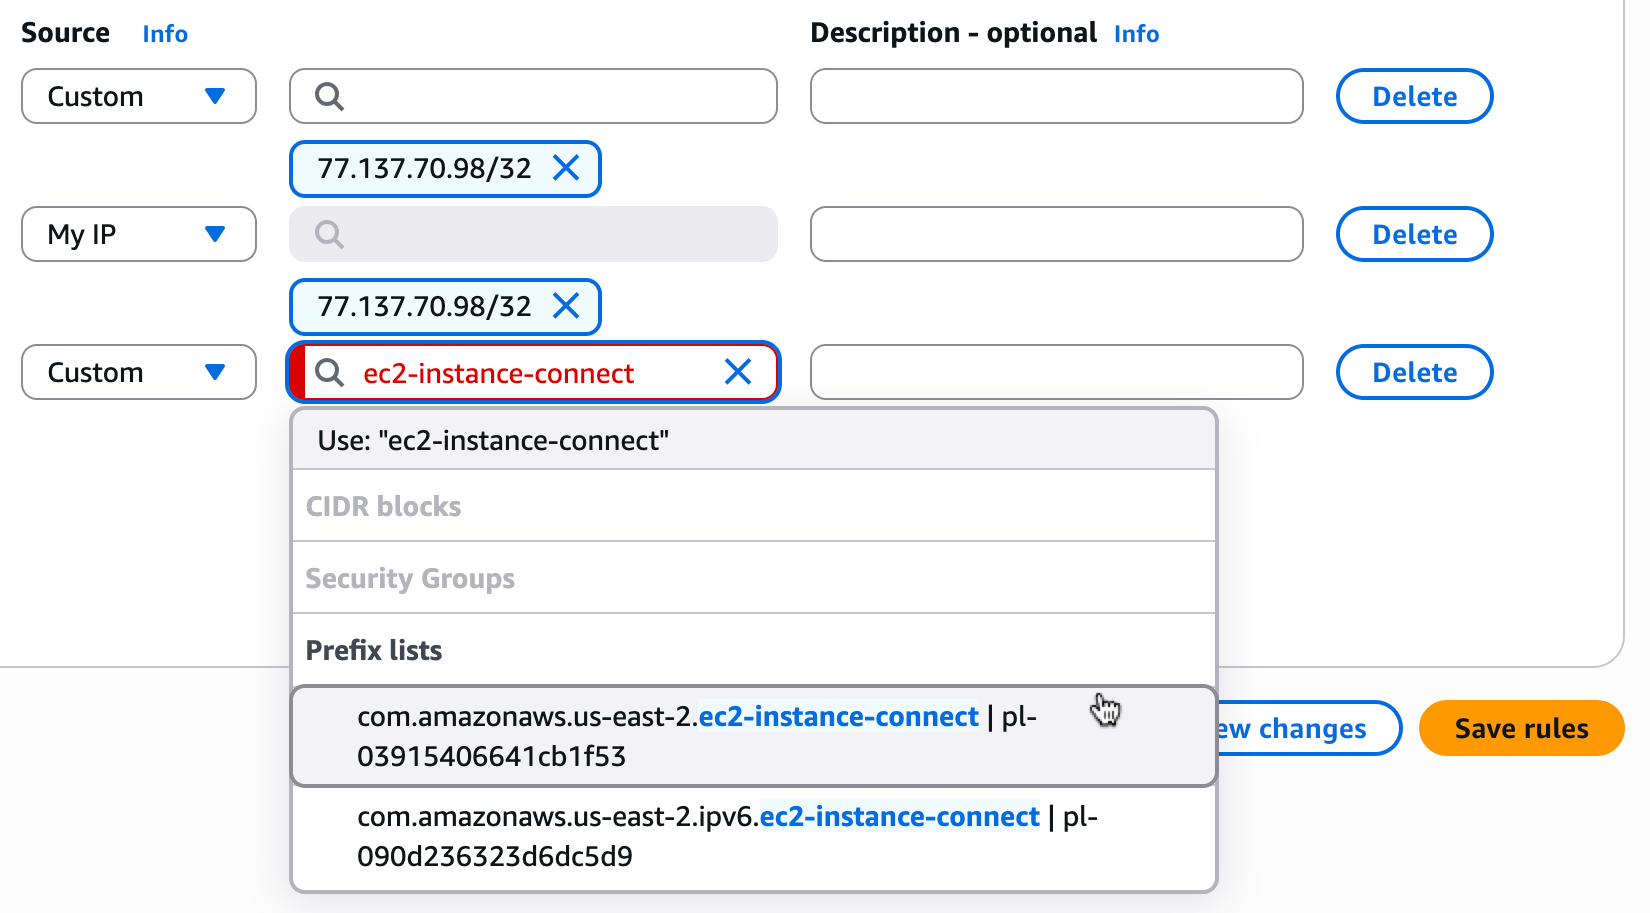
2. In the second rule, for **Type**, choose **SSH**. Click the text field next to **Source**, and search for `ec2-instance-connect`. Select the prefix list with the full name similar to `com.amazonaws.us-east-1.ec2-instance-connect`, depending on your region. This allows you to connect to the instance via AWS CloudShell.
2. Click **Edit inbound rules**.
3. Add two new rules by clicking **Add rule** each time:
1. In the first rule, for **Type**, choose **HTTP**, and under **Source**, select **My IP**.
2. In the second rule, for **Type**, choose **SSH**. Click the text field next to **Source**, and search for `ec2-instance-connect`. Select the prefix list with the full name similar to `com.amazonaws.us-east-1.ec2-instance-connect`, depending on your region. This allows you to connect to the instance via AWS CloudShell.
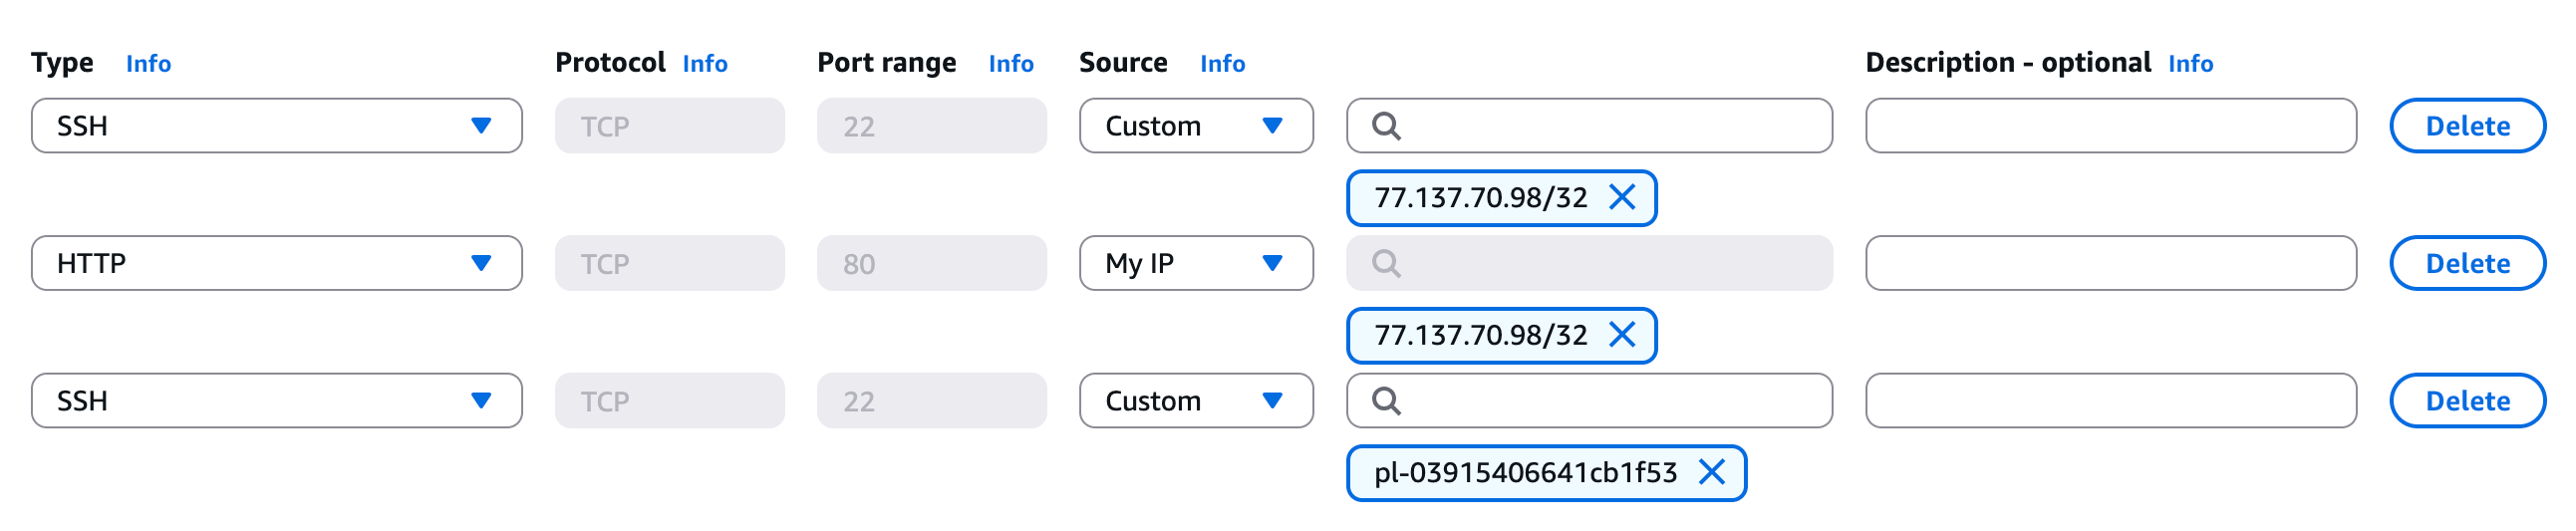
 The resulting set of inbound rules should look like this:
 4. Click **Save rules** to finish the configuration.
### Connect to the instance with CloudShell
1. Back in the instance details view of your EC2 instance, and click **Connect**.
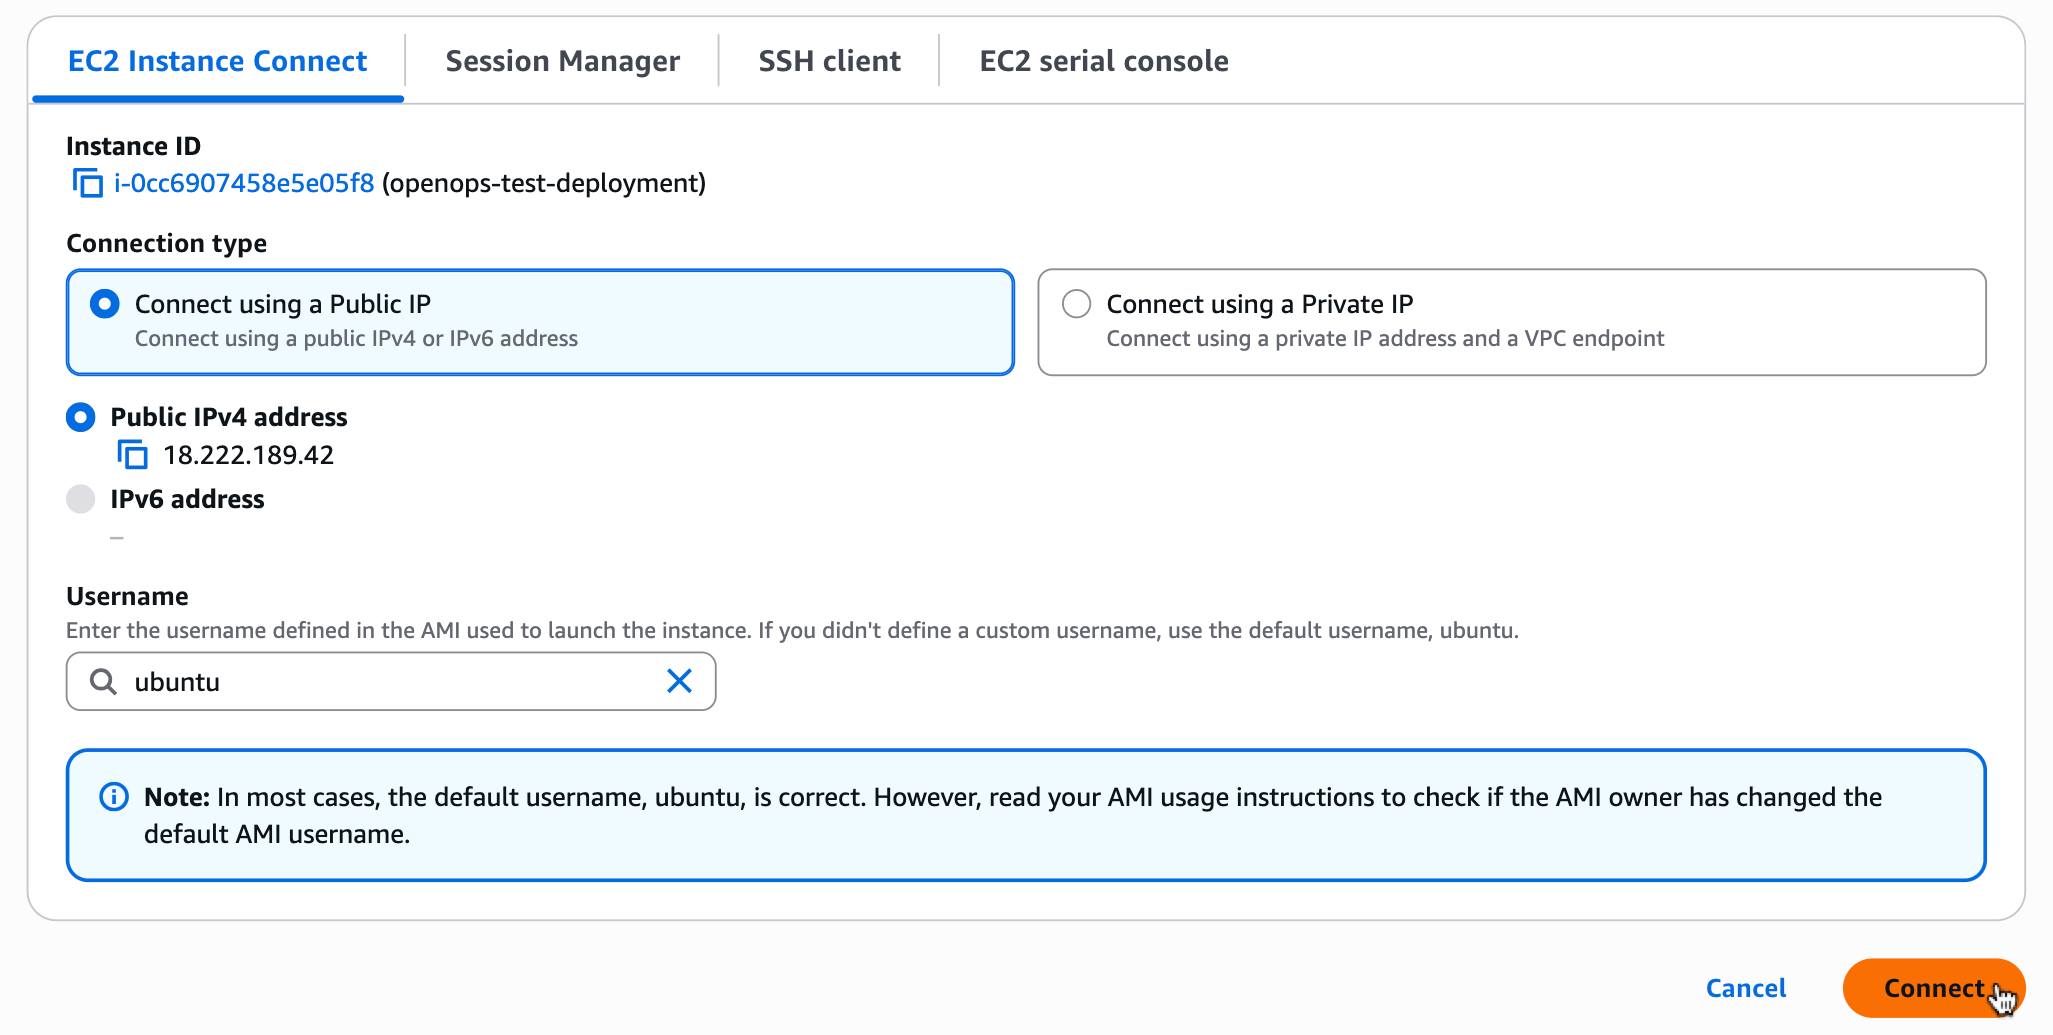
2. In the **Connect** view, use default connection settings and click **Connect** again, then wait for CloudShell to initialize an in-browser session.
4. Click **Save rules** to finish the configuration.
### Connect to the instance with CloudShell
1. Back in the instance details view of your EC2 instance, and click **Connect**.
2. In the **Connect** view, use default connection settings and click **Connect** again, then wait for CloudShell to initialize an in-browser session.
 ### Install OpenOps
Run the following command in your terminal to install, update, configure and run OpenOps:
```shell theme={null}
curl -fsS https://openops.sh/install | sh
```
Alternatively, you can follow the manual installation steps:
1. Install the `unzip` utility:
```shell theme={null}
sudo apt install unzip
```
2. Create a new directory and download the OpenOps release files:
```shell theme={null}
mkdir -p openops && cd openops && \
wget https://github.com/openops-cloud/openops/releases/download/0.6.18/openops-dc-0.6.18.zip && \
unzip -o openops-dc-0.6.18.zip && cp -n .env.defaults .env
```
3. Update the application URL to use the instance's external IP address:
```shell theme={null}
EXTERNAL_IP=$(curl -4 -s ifconfig.co)
sed -i "s|http://localhost|http://$EXTERNAL_IP|g" .env
```
4. Open the `.env` file in the OpenOps installation folder. Change the values of the following variables that represent credentials. Do it now, as you won't be able to change these values after the initial deployment:
* `OPS_OPENOPS_ADMIN_EMAIL`: the email of your OpenOps installation's root admin account.
* `OPS_OPENOPS_ADMIN_PASSWORD`: the password of your OpenOps installation's root admin account.
* `OPS_POSTGRES_USERNAME`: the username of the Postgres database that OpenOps uses.
* `OPS_POSTGRES_PASSWORD`: the password of the Postgres database that OpenOps uses.
* `OPS_ANALYTICS_ADMIN_PASSWORD`: the password of the [OpenOps Analytics](/reporting-analytics/data-visualization/) admin account (the username is hardcoded to `admin`).
5. Install Docker using Snap:
```shell theme={null}
sudo snap install docker
```
6. Pull the images and start the Docker containers:
```shell theme={null}
sudo COMPOSE_PARALLEL_LIMIT=4 docker compose pull -q && sudo docker compose up -d
```
If you encounter a rate limit, rerun the pull command. Note that pulling images may take several minutes.
If you did not update credentials in the `.env` file, the default username is `admin@openops.com` and the password is `please-change-this-password-1`.
You can now access the OpenOps application by navigating to the public IP address of your {target_0} (e.g., `http://20.20.20.20`).
## Network ports used by OpenOps
By default, OpenOps does not require any inbound ports other than the application port `80`.
The following ports are used by bundled services and, in most cases, should not be exposed:
* `5432`: The PostgreSQL database used by OpenOps. Expose this port only if you need direct database access, such as for [connecting OpenOps to external analytics tools](/reporting-analytics/connecting-to-external-tools/). Restrict access to a VPN or a trusted IP range.
* `6379`: OpenOps' internal Redis service. Expose this port only if required for debugging or monitoring purposes. Restrict access to a VPN or a trusted IP range.
## External databases
To use external PostgreSQL or Redis databases, modify the relevant variables in the `.env` file. You can disable the corresponding containers by adding a profile in the `docker-compose.yml` file:
```yaml theme={null}
services:
postgres:
profiles: ["db"]
```
If you remove or disable the `db` profile in `.env` or in Docker Compose, that container won't start.
After making any changes to the `.env` file, restart the OpenOps containers:
```shell theme={null}
sudo docker compose down
sudo docker compose up -d
```
## Enabling TLS
For production usage, it's recommended to enable TLS (HTTPS). In addition to the security aspect, this also ensures that [workflow templates](/workflow-management/workflow-templates/) load properly in all browsers.
### Automatically
The easiest way to enable TLS is to use an OpenOps script that requests and sets up a TLS certificate from Let's Encrypt. Before running the script, make sure you have a domain name that points to your {target_1}'s external IP address. If you're configuring DNS right before running the script, you may need to wait for the DNS change to propagate.
1. Run the following command in your terminal:
```shell theme={null}
curl -fsS https://openops.sh/tls | sh
```
2. When prompted, enter a domain name that points to the external IP address of your {target_1}.
3. When prompted, enter an email address to receive certificate-related notifications from Let's Encrypt.
The script will use the Certbot library to request a certificate for your domain from Let's Encrypt. It receives and saves the certificate, updates the OpenOps configuration file accordingly, and restarts OpenOps.
By default, the certificate expires in 3 months. See [https://certbot.org/renewal-setup](https://certbot.org/renewal-setup) if you want to configure auto-renewal.
### Manually
Alternatively, you can create a TLS certificate yourself. This lets you use DNS validation from Let's Encrypt (rather than the HTTP validation the automatic script performs) or request a certificate from a different provider.
To set up TLS manually:
1. Obtain certificate and private key files from your certificate provider.
2. Upload the certificate files to your OpenOps installation under the `tls` directory:
* `/tls/cert.pem` (certificate file)
* `/tls/key.pem` (private key file)
3. Open the `.env` file in your OpenOps installation directory and update the following variables:
* Set `OPS_NGINX_CONFIG_FILE` to `nginx.gateway.tls.conf`
* Set `OPS_PUBLIC_URL` to the secure URL of your OpenOps installation (e.g. `https://openops.example.com`)
After making any changes to the `.env` file, restart the OpenOps containers:
```shell theme={null}
sudo docker compose down
sudo docker compose up -d
```
## Disabling host validation
By default, OpenOps does not allow workflows to call internal network addresses such as `127.0.0.1` or `192.168.0.0`. This affects HTTP and SMTP actions, as well as webhook triggers. Host validation protects users from creating workflows that could accidentally or maliciously access internal services, scan networks, or escalate privileges.
You may need to disable this check in certain circumstances, such as in non-production deployments or when workflows intentionally interact with internal-only infrastructure.
To disable host validation, open the `.env` file in your installation folder and set the `OPS_ENABLE_HOST_VALIDATION` environment variable to `false`.
After making any changes to the `.env` file, restart the OpenOps containers:
```shell theme={null}
sudo docker compose down
sudo docker compose up -d
```
Disabling this check removes an important safety guard and may allow workflows to access internal infrastructure. Use caution and avoid disabling it in production.
## Configuring allowed SMTP ports
By default, OpenOps allows SMTP connections on ports 25, 465, 587, and 2525. Administrators can customize which SMTP ports are available by setting the `OPS_SMTP_ALLOWED_PORTS` environment variable in the `.env` file.
To configure allowed SMTP ports, open the `.env` file in your installation folder and set the `OPS_SMTP_ALLOWED_PORTS` variable to a comma-separated list of port numbers:
```shell theme={null}
OPS_SMTP_ALLOWED_PORTS=25,465,587,2525
```
Port numbers must be valid TCP ports in the range 1-65535. At least one valid port must be configured. Invalid port numbers will be filtered out.
After making any changes to the `.env` file, restart the OpenOps containers:
```shell theme={null}
sudo docker compose down
sudo docker compose up -d
```
## Updating OpenOps to a newer version
See [Updating OpenOps](/getting-started/updating-openops).
## Support
Feel free to join our [Slack community](https://slack.openops.com) if you have any questions or need help with your installation.
### Install OpenOps
Run the following command in your terminal to install, update, configure and run OpenOps:
```shell theme={null}
curl -fsS https://openops.sh/install | sh
```
Alternatively, you can follow the manual installation steps:
1. Install the `unzip` utility:
```shell theme={null}
sudo apt install unzip
```
2. Create a new directory and download the OpenOps release files:
```shell theme={null}
mkdir -p openops && cd openops && \
wget https://github.com/openops-cloud/openops/releases/download/0.6.18/openops-dc-0.6.18.zip && \
unzip -o openops-dc-0.6.18.zip && cp -n .env.defaults .env
```
3. Update the application URL to use the instance's external IP address:
```shell theme={null}
EXTERNAL_IP=$(curl -4 -s ifconfig.co)
sed -i "s|http://localhost|http://$EXTERNAL_IP|g" .env
```
4. Open the `.env` file in the OpenOps installation folder. Change the values of the following variables that represent credentials. Do it now, as you won't be able to change these values after the initial deployment:
* `OPS_OPENOPS_ADMIN_EMAIL`: the email of your OpenOps installation's root admin account.
* `OPS_OPENOPS_ADMIN_PASSWORD`: the password of your OpenOps installation's root admin account.
* `OPS_POSTGRES_USERNAME`: the username of the Postgres database that OpenOps uses.
* `OPS_POSTGRES_PASSWORD`: the password of the Postgres database that OpenOps uses.
* `OPS_ANALYTICS_ADMIN_PASSWORD`: the password of the [OpenOps Analytics](/reporting-analytics/data-visualization/) admin account (the username is hardcoded to `admin`).
5. Install Docker using Snap:
```shell theme={null}
sudo snap install docker
```
6. Pull the images and start the Docker containers:
```shell theme={null}
sudo COMPOSE_PARALLEL_LIMIT=4 docker compose pull -q && sudo docker compose up -d
```
If you encounter a rate limit, rerun the pull command. Note that pulling images may take several minutes.
If you did not update credentials in the `.env` file, the default username is `admin@openops.com` and the password is `please-change-this-password-1`.
You can now access the OpenOps application by navigating to the public IP address of your {target_0} (e.g., `http://20.20.20.20`).
## Network ports used by OpenOps
By default, OpenOps does not require any inbound ports other than the application port `80`.
The following ports are used by bundled services and, in most cases, should not be exposed:
* `5432`: The PostgreSQL database used by OpenOps. Expose this port only if you need direct database access, such as for [connecting OpenOps to external analytics tools](/reporting-analytics/connecting-to-external-tools/). Restrict access to a VPN or a trusted IP range.
* `6379`: OpenOps' internal Redis service. Expose this port only if required for debugging or monitoring purposes. Restrict access to a VPN or a trusted IP range.
## External databases
To use external PostgreSQL or Redis databases, modify the relevant variables in the `.env` file. You can disable the corresponding containers by adding a profile in the `docker-compose.yml` file:
```yaml theme={null}
services:
postgres:
profiles: ["db"]
```
If you remove or disable the `db` profile in `.env` or in Docker Compose, that container won't start.
After making any changes to the `.env` file, restart the OpenOps containers:
```shell theme={null}
sudo docker compose down
sudo docker compose up -d
```
## Enabling TLS
For production usage, it's recommended to enable TLS (HTTPS). In addition to the security aspect, this also ensures that [workflow templates](/workflow-management/workflow-templates/) load properly in all browsers.
### Automatically
The easiest way to enable TLS is to use an OpenOps script that requests and sets up a TLS certificate from Let's Encrypt. Before running the script, make sure you have a domain name that points to your {target_1}'s external IP address. If you're configuring DNS right before running the script, you may need to wait for the DNS change to propagate.
1. Run the following command in your terminal:
```shell theme={null}
curl -fsS https://openops.sh/tls | sh
```
2. When prompted, enter a domain name that points to the external IP address of your {target_1}.
3. When prompted, enter an email address to receive certificate-related notifications from Let's Encrypt.
The script will use the Certbot library to request a certificate for your domain from Let's Encrypt. It receives and saves the certificate, updates the OpenOps configuration file accordingly, and restarts OpenOps.
By default, the certificate expires in 3 months. See [https://certbot.org/renewal-setup](https://certbot.org/renewal-setup) if you want to configure auto-renewal.
### Manually
Alternatively, you can create a TLS certificate yourself. This lets you use DNS validation from Let's Encrypt (rather than the HTTP validation the automatic script performs) or request a certificate from a different provider.
To set up TLS manually:
1. Obtain certificate and private key files from your certificate provider.
2. Upload the certificate files to your OpenOps installation under the `tls` directory:
* `/tls/cert.pem` (certificate file)
* `/tls/key.pem` (private key file)
3. Open the `.env` file in your OpenOps installation directory and update the following variables:
* Set `OPS_NGINX_CONFIG_FILE` to `nginx.gateway.tls.conf`
* Set `OPS_PUBLIC_URL` to the secure URL of your OpenOps installation (e.g. `https://openops.example.com`)
After making any changes to the `.env` file, restart the OpenOps containers:
```shell theme={null}
sudo docker compose down
sudo docker compose up -d
```
## Disabling host validation
By default, OpenOps does not allow workflows to call internal network addresses such as `127.0.0.1` or `192.168.0.0`. This affects HTTP and SMTP actions, as well as webhook triggers. Host validation protects users from creating workflows that could accidentally or maliciously access internal services, scan networks, or escalate privileges.
You may need to disable this check in certain circumstances, such as in non-production deployments or when workflows intentionally interact with internal-only infrastructure.
To disable host validation, open the `.env` file in your installation folder and set the `OPS_ENABLE_HOST_VALIDATION` environment variable to `false`.
After making any changes to the `.env` file, restart the OpenOps containers:
```shell theme={null}
sudo docker compose down
sudo docker compose up -d
```
Disabling this check removes an important safety guard and may allow workflows to access internal infrastructure. Use caution and avoid disabling it in production.
## Configuring allowed SMTP ports
By default, OpenOps allows SMTP connections on ports 25, 465, 587, and 2525. Administrators can customize which SMTP ports are available by setting the `OPS_SMTP_ALLOWED_PORTS` environment variable in the `.env` file.
To configure allowed SMTP ports, open the `.env` file in your installation folder and set the `OPS_SMTP_ALLOWED_PORTS` variable to a comma-separated list of port numbers:
```shell theme={null}
OPS_SMTP_ALLOWED_PORTS=25,465,587,2525
```
Port numbers must be valid TCP ports in the range 1-65535. At least one valid port must be configured. Invalid port numbers will be filtered out.
After making any changes to the `.env` file, restart the OpenOps containers:
```shell theme={null}
sudo docker compose down
sudo docker compose up -d
```
## Updating OpenOps to a newer version
See [Updating OpenOps](/getting-started/updating-openops).
## Support
Feel free to join our [Slack community](https://slack.openops.com) if you have any questions or need help with your installation.