> ## Documentation Index
> Fetch the complete documentation index at: https://openops-ecb4f397-mintlify-add-install-command-explanation-5.mintlify.site/llms.txt
> Use this file to discover all available pages before exploring further.
# Passing Data
> How to pass data between workflow steps
export const NarrowImage = ({src, alt, widthPercent}) => {
const className = `narrow-image-${useId().replace(/:/g, '-')}`;
const widthRule = widthPercent ? `width: ${widthPercent}%;` : '';
return <>
 ;
};
Any OpenOps workflow consists of multiple steps. The first step is a **trigger**, followed by any number of **action** steps.
## The general principle of data flow
Any [action](/workflow-management/actions/) step can access the output data of any of its previous steps: both the trigger and actions.
For example, in the section of a workflow shown above:
* **Step 4** has access to data produced by steps 3, 2, and 1.
* **Step 3** has access to data produced by steps 2 and 1.
* **Step 2** has access to data produced by step 1.
There are certain nuances when it comes to accessing data from loops and conditional statements that were executed before:
1. If there was a conditional statement, such as **Condition** or **Split**, before your current action, then your current action will not have access to the outputs of any actions inside the branches of the conditional statement. If you need the output of actions in these branches to be available after the conditional statement completes, make sure to save it elsewhere, such as in OpenOps’ internal storage using the **Put** action in the **Storage** block. You can then retrieve it from storage using the **Get** action in the same block.
2. This is also true for loops: the output of actions that occur inside a loop is not available outside the loop. If you need any data from the loop after it completes, make sure to save the data to storage while still inside the loop.
## Selecting data from prior steps
When you create a new action step, chances are that its properties pane contains one or more data fields that accept data from previous steps. When you click in a data field, it opens the **Data Selector** pane, which helps you select a piece of data produced by previous steps as the input for the current step.
Continuing with the example above, when you click in the **Items** field in the properties pane of the **Loop on items** action step, the **Data Selector** suggests all data generated prior:
;
};
Any OpenOps workflow consists of multiple steps. The first step is a **trigger**, followed by any number of **action** steps.
## The general principle of data flow
Any [action](/workflow-management/actions/) step can access the output data of any of its previous steps: both the trigger and actions.
For example, in the section of a workflow shown above:
* **Step 4** has access to data produced by steps 3, 2, and 1.
* **Step 3** has access to data produced by steps 2 and 1.
* **Step 2** has access to data produced by step 1.
There are certain nuances when it comes to accessing data from loops and conditional statements that were executed before:
1. If there was a conditional statement, such as **Condition** or **Split**, before your current action, then your current action will not have access to the outputs of any actions inside the branches of the conditional statement. If you need the output of actions in these branches to be available after the conditional statement completes, make sure to save it elsewhere, such as in OpenOps’ internal storage using the **Put** action in the **Storage** block. You can then retrieve it from storage using the **Get** action in the same block.
2. This is also true for loops: the output of actions that occur inside a loop is not available outside the loop. If you need any data from the loop after it completes, make sure to save the data to storage while still inside the loop.
## Selecting data from prior steps
When you create a new action step, chances are that its properties pane contains one or more data fields that accept data from previous steps. When you click in a data field, it opens the **Data Selector** pane, which helps you select a piece of data produced by previous steps as the input for the current step.
Continuing with the example above, when you click in the **Items** field in the properties pane of the **Loop on items** action step, the **Data Selector** suggests all data generated prior:
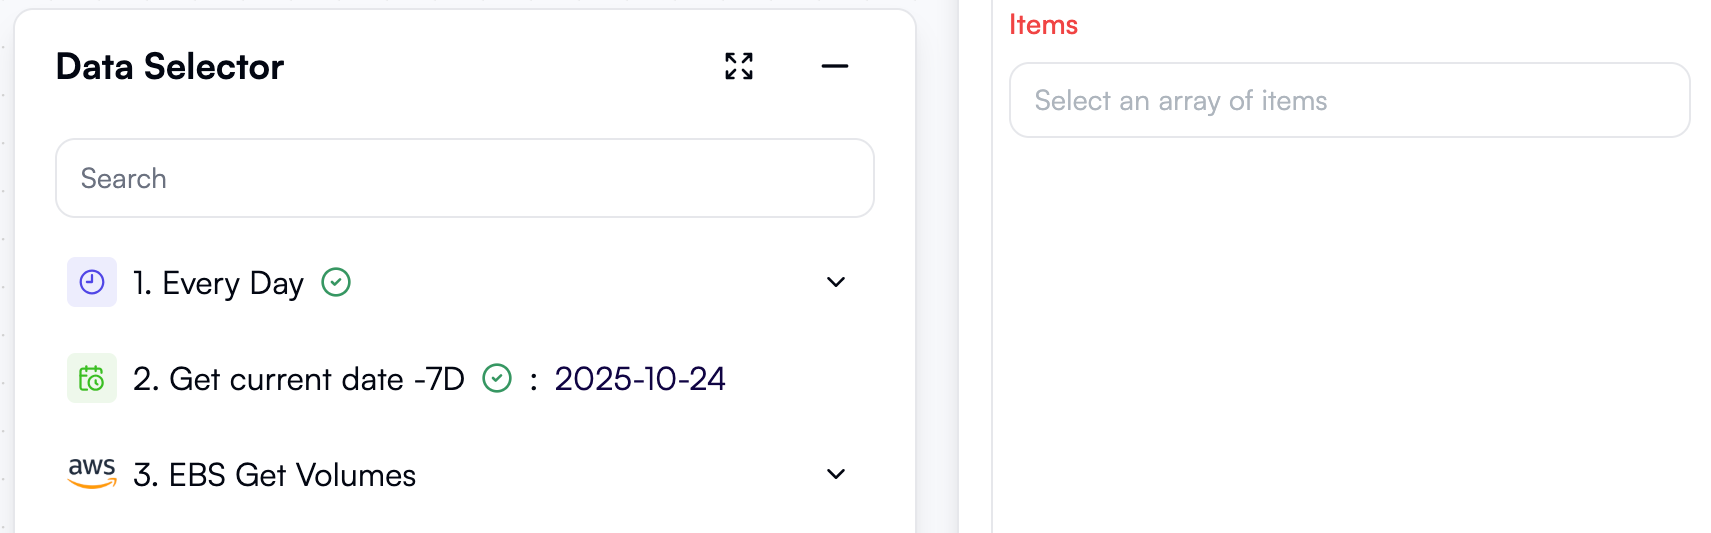 If an item in this panel has a caret (**⌄**) to the right, you can click on it to expand its children. When you've found the piece of data you need, click **Insert** next to it to use it in the current data field.
Take time to expand the items before inserting them to understand the type of data they contain and whether they're the right fit for your needs. For example, if you're inside a loop, you may not need the entire object from the current loop iteration — expand it until you find the specific value you need:
If a property provides a fixed list of values (such as a dropdown) but you're not happy with any of them, click the **Dynamic** toggle on the top right of the property. This turns the property into a regular input where you can use the **Data Selector** to choose a custom value:
Also note that although the **Data Selector** appears in every input field, you don't always have to use it. Sometimes, you can simply enter a value manually. For example, if you're using the **Group By** action to regroup a list, just type in the property key that you want to group by in the **Property Key** field:
## Transforming outputs
Sometimes, the output of a previous step may not be immediately suitable for use in your next steps. In this case, you can use several [actions](/workflow-management/actions/) or combinations of actions to transform the output into a different format:
* Use actions from the **Text Operations** block to concatenate, split, or otherwise transform text values.
* Use actions from the **Math Operations** block to perform arithmetic operations, calculate averages, or return minimum and maximum values.
* Use actions from the **Date Operations** block to format dates, extract individual date units (year, month, day, hour, etc.), or calculate date differences.
If the output you want to transform is a list, first create a loop using the **Loop on Items** action, then use any of the actions listed above to transform individual list entries inside the loop.
There's also a block of actions called **List Operations** that you can apply to a list without creating a loop:
* **Group By** creates several nested lists, each containing one distinct value of a property that you specify.
* **Map List Items** does the same as **Group By**, but makes each nested list the value of a separate property.
* **Extract From List** keeps only one out of many properties in each list item.
Finally, if none of the transformation actions above meet your needs, use the **Custom TypeScript Code** action in the **Code** block to define a bespoke transformation in TypeScript or JavaScript. If you're not an experienced developer, [AI assistance](/ai-assistance/overview/) can help you generate the code.
If an item in this panel has a caret (**⌄**) to the right, you can click on it to expand its children. When you've found the piece of data you need, click **Insert** next to it to use it in the current data field.
Take time to expand the items before inserting them to understand the type of data they contain and whether they're the right fit for your needs. For example, if you're inside a loop, you may not need the entire object from the current loop iteration — expand it until you find the specific value you need:
If a property provides a fixed list of values (such as a dropdown) but you're not happy with any of them, click the **Dynamic** toggle on the top right of the property. This turns the property into a regular input where you can use the **Data Selector** to choose a custom value:
Also note that although the **Data Selector** appears in every input field, you don't always have to use it. Sometimes, you can simply enter a value manually. For example, if you're using the **Group By** action to regroup a list, just type in the property key that you want to group by in the **Property Key** field:
## Transforming outputs
Sometimes, the output of a previous step may not be immediately suitable for use in your next steps. In this case, you can use several [actions](/workflow-management/actions/) or combinations of actions to transform the output into a different format:
* Use actions from the **Text Operations** block to concatenate, split, or otherwise transform text values.
* Use actions from the **Math Operations** block to perform arithmetic operations, calculate averages, or return minimum and maximum values.
* Use actions from the **Date Operations** block to format dates, extract individual date units (year, month, day, hour, etc.), or calculate date differences.
If the output you want to transform is a list, first create a loop using the **Loop on Items** action, then use any of the actions listed above to transform individual list entries inside the loop.
There's also a block of actions called **List Operations** that you can apply to a list without creating a loop:
* **Group By** creates several nested lists, each containing one distinct value of a property that you specify.
* **Map List Items** does the same as **Group By**, but makes each nested list the value of a separate property.
* **Extract From List** keeps only one out of many properties in each list item.
Finally, if none of the transformation actions above meet your needs, use the **Custom TypeScript Code** action in the **Code** block to define a bespoke transformation in TypeScript or JavaScript. If you're not an experienced developer, [AI assistance](/ai-assistance/overview/) can help you generate the code.